

Discover the joy of Homemade Baked Alaska, a show-stopping dessert that’s both impressive and delicious.
If you’ve never heard of a Baked Alaska, also known as a Bomb Alaska, then in essence it’s a dessert that combines contrasting temperatures and textures to create a visual and taste sensation.
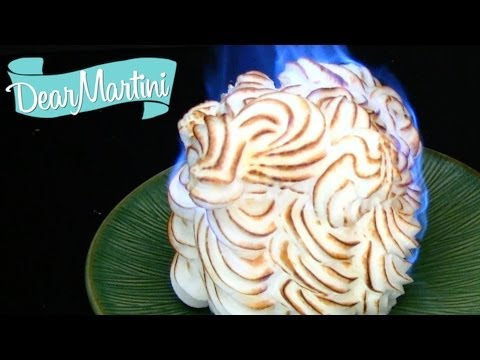
Often a Baked Alaska will be served at your table in a restaurant and then flambéd table-side to add to the visual element of this dessert, the fire! It’s quite impressive to see.
 Baked Alaska is a combination of ice cream, sponge cake, and meringue that’s assembled together and then charred or flambéd to create a baked appearance.
In this article, we’ll share with you the history of a Baked Alaska, the components involved in creating this all-time classic dessert, and of course, we’ll provide a step-by-step guide on how you can create your very own Homemade Baked Alaska, it truly is the bomb!
If you’d prefer, you can scroll down to the bottom of the article straight to the recipe and method, or you can read along to learn more.
The Delicious History of Baked Alaska: Where Fire Meets Ice
The origin of Baked Alaska is a tale as rich as the dessert itself. This flamboyant treat is often associated with the United States, particularly the culinary innovation of French chef Charles Ranhofer, who worked at Delmonico’s restaurant in New York City in the 1860s.
The name “Baked Alaska” may have been coined to commemorate the United States’ acquisition of Alaska from Russia in 1867. Ranhofer wanted to celebrate this event and chose the name “Alaska” to honour the newly acquired territory, with the “Baked” part signifying the method of cooking.
Baked Alaska, is also known as “glacé au four” or “omelette norvégienne,” a dessert that marries contrasting temperatures and textures to create a culinary sensation.
Baked Alaska – A Flaming Culinary Masterpiece
The dessert’s preparation requires a selection of skills to combine the crisp caramelisation of meringue with the preservation of ice cream within. It’s a culinary masterpiece that showcases the contrasting elements of fire and ice.
Baked Alaska is as much a visual spectacle as a delicious dessert, making it a popular choice for special occasions and celebrations. Baked Alaska remains a much-loved classic, enjoyed by dessert lovers worldwide.
What sets Baked Alaska apart is its flamboyant presentation – combining luxurious cool ice cream encased in the softness of a light sponge cake, finished with the visual and textural layer of a meringue, which is then briefly exposed to a fiery oven or often flambéd to complete a show-stopping dessert.
The contrast between ice-cold creaminess and the flame-charred meringue is both dramatic and delicious.
So now that you’ve learned a little about the history of this dessert along with an idea of the makeup of it, are you ready to give it a go yourself?
Homemade Baked Alaska Recipe
Let’s split the process into three sections, The Ice Cream Centre, The Sponge Cake, and finally the all-important Meringue.
1. Ice Cream Centre:
Ingredients:
Method:
-
- Allow the ice cream to soften slightly at room temperature for about 5-10 minutes, making it easier to shape.
- Line a bowl of suitable size with plastic wrap, ensuring there’s enough excess wrap hanging over the edges.
- Spoon the softened ice cream into the lined bowl, shaping it into a dome. Ensure it’s compact and covers the entire inside of the bowl.
- Cover the ice cream with the excess plastic wrap and place it in the freezer to firm up for at least 2 hours or until solid.
2. Sponge Cake:

Ingredients:
-
-
150g self-raising flour
- 150g caster sugar
- 150g unsalted butter, softened
- 3 large eggs
- 1 tsp vanilla extract
-
Method:
-
- Preheat your oven to 180°C (160°C for fan ovens) or Gas Mark 4. Grease and line a 20cm round cake tin.
- In a mixing bowl, beat together the softened butter and caster sugar until light and fluffy.
- Add the eggs one at a time, beating well after each addition. Stir in the vanilla extract.
- Gradually fold in the self-raising flour until you have a smooth cake batter.
- Pour the batter into the prepared cake tin and bake in the preheated oven for about 20-25 minutes or until a skewer inserted into the centre comes out clean.
- Allow the cake to cool in the tin for a few minutes before transferring it to a wire rack to cool completely.
3. Preparing Meringue for Baked Alaska:
Creating a perfect meringue is a crucial element of making Baked Alaska. It not only provides a textural contrast to the ice cream and sponge cake but also serves as an insulator that protects the ice cream from melting during the brief baking or torching process.
Here’s how to prepare meringue for your Baked Alaska:
 Ingredients:
- 4 large egg whites, at room temperature
- 1 cup (200g) granulated sugar
- 1/2 teaspoon cream of tartar
- 1 teaspoon vanilla extract
Method:
- Prepare Your Equipment: Ensure your mixing bowl and beaters are clean, dry, and free of any grease or residue, as even a tiny amount of fat can prevent the egg whites from properly whipping.
- Separate the Eggs: Carefully separate the egg whites from the yolks, making sure no yolks mix with the whites. Even a small amount of yolk can affect the meringue’s consistency.
- Whip the Egg Whites: In a large mixing bowl, beat the egg whites on medium speed until they become foamy. This should take a minute or two.
- Add Cream of Tartar: Add the cream of tartar to the egg whites. Cream of tartar stabilises the meringue and helps it achieve and maintain the desired structure.
- Gradually Add Sugar: Begin adding the granulated sugar one tablespoon at a time while the mixer is running. Gradually incorporating the sugar ensures it dissolves into the egg whites, creating a smooth and stable meringue. Continue to beat until stiff peaks form. This means the meringue should stand up on the beaters with a pointed tip. (The best test to make sure your cream is whipped sufficiently is to tip the bowl with your mixed egg whites over your head – if it’s mixed sufficiently you’ll be fine, if not you’ll have a mess to clean up!)
- Add Vanilla Extract: Gently fold in the vanilla extract. The vanilla not only enhances the flavour but also adds a pleasant aroma to the meringue.
Tips for Achieving a Fluffy and Firm Meringue:
- Room Temperature Eggs: Start with egg whites at room temperature. This helps create a more stable and voluminous meringue.
- Clean Equipment: Ensure your mixing bowl and beaters are impeccably clean and free from any traces of grease or yolk.
- Cream of Tartar: Using cream of tartar helps create a firmer and more stable meringue.
- Gradual Sugar Addition: Adding sugar slowly while the mixer is running ensures it integrates evenly and dissolves completely.
- Beating Time: Whip the egg whites until stiff peaks form, but avoid overbeating, which can cause the meringue to become dry or grainy.
With these steps and tips, you’ll create a fluffy, firm meringue that’s not only visually appealing but also the perfect topping for your Baked Alaska.
Assembling Your Baked Alaska:
That’s all the elements prepared, now to bring it all together.
That’s all the elements prepared, now you need to assemble your Baked Alaska using the three separate elements: the ice cream centre, the sponge cake, and the meringue.
- Prepare the Ice Cream Centre:
-
- After the ice cream has firmed up in the freezer, remove it from the bowl using the excess plastic wrap as handles. Place it upside down in the centre of a serving platter or baking tray.
-
- Remove the plastic wrap entirely and return the ice cream to the freezer while you prepare the cake and meringue.
- Prepare the Sponge Cake:
- Once the sponge cake has cooled completely, trim the top to make it flat and even. The size of the cake should match the size of the ice cream dome.
- Place the trimmed sponge cake on top of the ice cream dome.
- Prepare the Meringue:
- Follow the steps for preparing the meringue as outlined above.
- Cover with Meringue:
- To assemble the Baked Alaska, place the sponge-topped ice cream dome on a serving platter or baking tray.
- Cover the entire dessert with the prepared meringue, ensuring it completely encases the ice cream and the sponge cake. You can use a spatula or a spoon to shape the meringue attractively.
- Make sure the meringue touches the platter or tray to create a seal.

- Brown the Meringue:
- Preheat your grill (broiler) to a high setting.
- Place the assembled Baked Alaska under the preheated grill. Keep a close eye on it as the meringue will brown quickly. This step is merely to brown the meringue, not to cook the inside of the dessert.
- Grill the Baked Alaska for about 1-2 minutes or until the meringue is golden brown.
- Or you could blow torch the meringue, this is a simple method, but of course, one in which care must be taken.
- And then there’s the mesmerising flambe method. See below for Flambéing.
- Serve and Enjoy:
- Once the meringue is nicely browned, carefully remove the Baked Alaska from the grill.
- Slice the Baked Alaska into portions and serve immediately. The contrast between the warm, toasted meringue and the cold, creamy ice cream is something quite special.
Enjoy your homemade Baked Alaska, which is sure to impress your guests with its delicious taste and stunning presentation!
Flambéing the Meringue:

If you want to recreate the visual flamboyance of flambeeing your baked Alaska, here’s the process listed below:
- Prepare the Baked Alaska: Assemble your Baked Alaska with the ice cream centre, sponge cake, and meringue as described in the previous instructions.
- Heat the Alcohol: Choose a flammable alcohol such as rum or brandy. In a small saucepan or skillet, pour about 60ml (1/4 cup) of the chosen alcohol. Heat it over low heat until it’s warm but not boiling.
- Ignite the Alcohol: Carefully ignite the warm alcohol. You can use a long lighter or a long match to do this. Tilt the pan slightly to catch the flame. Be cautious as it may create a large flame.
- Pour Over the Baked Alaska: While the alcohol is still flaming, immediately pour it over the meringue on your Baked Alaska. The meringue will catch fire and create a spectacular flaming effect.
- Serve: Allow the flames to burn for a few moments (it’s mostly for a dramatic effect) before serving. The alcohol will burn off quickly, leaving behind a subtle flavour.
- Enjoy: Serve your Baked Alaska while it’s still warm from the flambe process. The meringue should have a toasted appearance and a hint of the alcohol’s flavour.
Remember to exercise extreme caution when working with open flames, and never pour alcohol directly from the bottle near an open flame. Safety first!
This flambe method can add an exciting and visually stunning element to your Baked Alaska presentation. Enjoy the show before indulging in this delicious dessert!
Helpful Tips for Making Baked Alaska:
- Plan Ahead: Baked Alaska is best when prepared in advance. You can make the ice cream and sponge cake layers ahead of time, leaving only the meringue step for when you’re ready to serve.
- Use Quality Ingredients: Opt for high-quality ice cream and a sponge cake recipe you trust (homemade is best! #justsaying). The better the components, the more delicious the Baked Alaska.
- Smooth Ice Cream Layer: Ensure the ice cream layer is evenly spread and smooth. Use an offset spatula to achieve a polished look.
- Freezing Time: After assembling the dessert, give it ample time to freeze before adding the meringue. A minimum of 2 hours in the freezer is recommended.
- Insulating with Meringue: When spreading the meringue over the ice cream and cake, make sure there are no gaps, and it completely covers the dessert. The meringue acts as insulation to protect the ice cream during the torching or baking process.
- Preheat Your Oven: If you’re using the oven method to brown the meringue, ensure your oven is fully preheated to give a quick, even browning.
Common Mistakes to Avoid:
- Melting Ice Cream: If your ice cream melts during the meringue preparation or assembly, it can result in a soggy Baked Alaska. Make sure the ice cream is well-frozen before proceeding.
- Greasy Equipment: Any grease or residue in your mixing bowl or beaters can prevent the meringue from forming stiff peaks. Ensure all equipment is clean and dry.
- Yolk Contamination: Even a small amount of egg yolk in the egg whites can prevent them from properly whipping into meringue. Be very cautious when separating the eggs.
- Overbeating or Underbeating Meringue: Whipping the meringue too much can make it dry and grainy while underbeating can result in a weak structure. Aim for stiff peaks without overdoing it.
- Meringue Gaps: If there are gaps or exposed areas in the meringue, the ice cream is at risk of melting during torching or baking. Ensure the meringue completely covers the dessert.
- Torching or Baking Too Long: When browning the meringue, keep a close eye on it. Torch or bake just until the meringue is beautifully browned, but be careful not to overdo it.

By following these tips and avoiding common mistakes, you’ll increase your chances of creating a flawless and delicious Baked Alaska.
We hope that you have enjoyed our article – Homemade Baked Alaska. It’s the Bomb! – learning about this delicious and spectacular dessert that is a Baked Alaska and learning how you can make your own.
If you have any questions whatsoever, please feel free to drop us a comment below and of course, we would love to hear from you if you do give this dessert a go yourself.
Stay connected for more homemade ice cream inspiration! Join us for mouthwatering recipes, expert tips, and exclusive updates. Follow us on Pinterest, Instagram, Facebook, and X by clicking on any of the social media icons below.


Hi Cherie, Hey there! I stumbled upon your homemade Baked Alaska recipe, and oh my goodness, it’s a real gem! 🌟 I love how you’ve broken down each step so clearly, making it super easy for even a kitchen newbie like me to follow along. The vibrant pictures you’ve included are like eye candy, making me want to dive right into the screen and grab a spoon!
One thing I’m curious about is your choice of ice cream flavors. You mentioned using vanilla and raspberry, which sounds divine, but have you experimented with any other flavor combinations? I’m always up for a tasty twist! Also, your tips on how to achieve that perfect meringue topping are spot on, but do you have any troubleshooting advice if it doesn’t turn out quite as fluffy as expected? Keep up the fantastic work—I can’t wait to see what delicious delights you whip up next! 🍰
Bob
Hey Bob,
Thanks for your comment and positive feedback. Really glad you appreciated our article on Baked Alaska, it really is a gem of the Ice Cream Dessert world. So glad that you found the step-by-step guide useful and I hope you’re feeling inspired to give this recipe a go.
Experimentalist is our middle name, we are always trying out new flavours. We’ve tried it with Mint, Chocolate, White Chocolate too, also a salted caramel ice cream which was quite something and really worked well with the meringue. There really are no limits, which is what is wonderful about Homemade – you can adjust to your preferences, adjust the sweetness, the flavour combo’s etc, it’s great fun trying different combinations out.
Hmm, dodgy Meringue… Hints or tips if it doesn’t work out? Try again? lol. Seriously, I find the biggest problem with meringues is the whipping of the egg whites. If not whipped enough the meringues can be a tad flat and not fluffy as you’ve mentioned, if whipped too much they can end up being flaky, and the structure of the meringue breaks down. So getting that balance right is key.
Hope that helps and once again, thanks for dropping by and sharing your thoughts.
Wishing you all the best
Cherie :o)