

Making Homemade Ice Cream can be a great deal of fun and very rewarding, not least because you have the fruits of your labours to indulge in and enjoy once you’ve finished and that is something to truly celebrate!
 Making Homemade Ice cream is also very engaging and something the whole family can get involved in – not just the eating part. There are varying levels of skill and technique required so the little ones can certainly get their hands dirty too, it can be a very social, family-driven experience.
There are endless benefits to making your own Homemade Ice cream, first and foremost, you know exactly what’s in your ice cream, which you can tailor to your exact needs.
The entire family can get involved, teaching them valuable life skills (being able to make ice cream ought to be up there with learning to swim, learning to ride a bike, learning to make delicious, indulgent, healthy, moreish ice cream – these skills will serve you well in life!)
Sounds Great, but Where Do I Start?
If making Homemade Ice Cream is not something you’ve done in the past, then, of course, you’ll ask yourself, where on earth do I start? What equipment will I need? What Ingredients do I use? etc.
Be assured, making Homemade Ice Cream is in fact, quite simple.
We’ll show you how you can make delicious, creamy indulgent ice creams that your family, friends, neighbours, and the whole street will be queuing for!
Let’s get into the benefits, the processes, different variations and methods, the equipment you’ll likely require, the whole shab-bang. Ready?
Benefits of Making Homemade Ice Cream
Making your own homemade ice cream offers several benefits that contribute to a fun and very satisfying experience. Here are some of those benefits:
- Control over ingredients and customisation: One of the significant advantages of making homemade ice cream is having complete control over the ingredients used. Unlike store-bought ice cream, you can choose high-quality ingredients, adjust the sweetness level, and avoid artificial additives or preservatives. This allows you to create a healthier and more wholesome treat tailored to your preferences. Additionally, homemade ice cream offers endless opportunities for customisation. You can experiment with various flavours, mix-ins, and toppings, allowing you to unleash your creativity and create unique combinations that suit your taste buds.
- The Role of Sweeteners in Ice Cream: Sweeteners play a crucial role in ice cream production, influencing both taste and texture. They provide the sweetness that we associate with this delicious frozen treat. However, the excessive consumption of added sugars has become a growing concern in our diets, contributing to various health issues such as obesity and diabetes. Ice cream manufacturers are increasingly exploring alternatives to traditional sugars, such as natural sweeteners and sugar substitutes, to address these concerns while maintaining the indulgent experience that ice cream offers. Balancing the desire for a satisfyingly sweet ice cream with the need for healthier options is a challenge the industry is actively addressing to cater to modern dietary preferences and promote overall well-being. To find out more about Sweeteners, click on this link to take you to What are Natural Sweeteners? – Plantaful Life
- Superior taste and freshness: Homemade ice cream often surpasses store-bought options in terms of taste and freshness. By using fresh and high-quality ingredients, you can achieve a more vibrant and intense flavour profile. The texture of homemade ice cream can also be smoother and creamier, especially when using a custard base. The satisfaction of enjoying a scoop of homemade ice cream that you crafted with care and attention to detail adds an extra layer of enjoyment to the experience. Furthermore, homemade ice cream can be enjoyed at its peak freshness, as you can make it in small batches and consume it shortly after preparation, ensuring optimal flavour and texture.
Learning the Basics
 If you head on over to our Ice Cream Flavours to Make Your Taste Buds Tingle post you’ll see listed a selection of popular ice cream flavours. Ranging from Strawberry to Mint Choc Chip and lastly good ol’ Classic Vanilla. All these flavours require, in essence, the same preparation, just some modifications for each flavour profile.
We’ll start with a classic vanilla-based Ice Cream – This is the starting block of making your own homemade ice cream, if you can master Vanilla, you’ve got the rest covered with a few tweaks here or there.
What You’ll Need
Most kitchens will have the equipment required to make Homemade Ice Cream. Yes, you can buy an Ice Cream Maker, but you don’t need one, you can make ice cream that’s quite delicious and creamy without having one. Check out our article on How to Make Homemade Ice Cream; Without an Ice Cream Maker.
Of course, there are arguments that an Ice cream maker makes the process a lot easier and this to a certain extent is true. But it’s not an absolute requirement.
Let’s list everything you’ll need:
- Ice cream maker: An ice cream maker churns the ice cream mixture to incorporate air and create a smooth and creamy
 texture. There are many different types of ice cream makers available, including electric and manual models. Check out our What’s the Best Ice Cream Maker Review.
 - Blender or Food Processor: Either one of these will be required to blend or puree your ingredients ready for combining with your milk and cream mixtures.
- Mixing bowls: You will need mixing bowls to combine the ingredients for the ice cream mixture. It’s a good idea to have a few different sizes of mixing bowls on hand to accommodate different recipes.
- Whisk or electric mixer: A whisk or electric mixer is used to blend the ingredients and create a smooth mixture.
 Measuring cups / weighing scales: Measuring cups or weighing scales are essential for accurately measuring the ingredients for the ice cream mixture.
- Spoons: Always have lots of spoons to hand for tasting your ice cream at different stages of the process (we don’t want double dipping!)
- Spatula: for making sure you get all the ice cream out of each vestibule (saucepan, mixing bowls) and there’s no waste.
- Saucepan: A saucepan may be needed to heat the ingredients for the ice cream mixture, depending on the recipe you’re following.
- Freezer-safe container: Once the ice cream is churned, it will need to be transferred to a freezer-safe container for storage (Note; takeaway tubs are ideal storage containers for ice cream – they’re airtight and they stack well. So next time you have a takeaway, don’t throw the containers away, give them a good rinse and re-use them. They are excellent freezer-friendly containers, generally around 400-500ml, so a decent portion size and by re-using them, instead of chucking them in the bin, you’re doing your bit for the environment too! Win-win).
- Ice cream scoop: An ice cream scoop is used to serve the ice cream.
- Zester / Microplane: In some cases, you’ll need a zester or microplane grater (for zesting citrus fruits).
If you don’t have an ice cream maker, there are alternative methods for making ice cream that do not require one. These methods may require different equipment, such as a blender or food processor, or may involve using naturally thickening ingredients like condensed milk.
Overall, it’s not an exhaustive list of equipment/utensils that you’ll require and you’ll likely have most of these utensils in your kitchen already. If you find you’re missing any, head on over to our post – What Equipment Do You Need to Make Homemade Ice Cream? – which provides a list of all equipment along with some useful links.
Which Methods Should I Use?
There are several methods of creating Vanilla Ice Cream. Some people will insist you must use a custard base, others will insist you must use an Ice Cream Maker for a more fluffy, light consistency. Others will say only to use Vanilla pods for maximum flavour.
Ultimately it’s YOU and your family who will be eating the Ice Cream that you make and YOU will find your groove of what works for you and your family. So feel free to experiment, and adapt each recipe to what suits you.
With my kids, they are very sensory-driven. Textures are very important, taste of course plays a part, and the visual look of the ice cream is crucial. My kids, for example, don’t like the speckles in Vanilla Ice Cream from using a Vanilla pod for the flavour. So we use Vanilla extract instead of Vanilla pods. We find this works for our needs. Note; If using Vanilla flavouring rather than Vanilla pods, always opt for Vanilla Extract over Vanilla Essence. The Vanilla flavour comes through stronger from Vanilla Extract.
Let’s detail the different options and methods, and you can decide what works best for you.
Eggless Vanilla Ice Cream
 Ingredients:
- 250ml double cream (or whipping cream)
- 125ml whole milk
- 75g caster sugar
- 2 teaspoons pure vanilla extract
Instructions:
- Add the Sugar and Milk to a saucepan and gently heat. Stir the mixture until the sugar has dissolved. Remove from the heat and allow to cool.
- Once the mixture has cooled, pour into a mixing bowl and add the double cream and vanilla extract. Stir thoroughly to ensure an even distribution of flavours.
- Cover the bowl with plastic cling film or a lid and refrigerate the mixture for at least 2-3 hours, or preferably overnight. (Chilling the mixture thoroughly will help improve the texture and flavour of the ice cream).
- Once the mixture is well-chilled, give it a good stir to ensure the ingredients are well combined.
- Pour the chilled mixture into an ice cream maker and churn according to the manufacturer’s instructions. This usually takes about 20-25 minutes, but the time may vary depending on your specific ice cream maker.
- (If you don’t have an Ice cream maker, check out our post How to Make Homemade Ice Cream: Without an Ice Cream maker).
- The ice cream is ready when it reaches a soft, creamy consistency. If you prefer a firmer texture, transfer the churned ice cream into a lidded container and place it in the freezer for an additional 2-3 hours.
- Scoop the delicious eggless vanilla ice cream into bowls or cones and enjoy it as is or pair it with your favourite desserts and toppings.
Note:
- You can customise this base by adding mix-ins such as chocolate chips, crushed cookies, or fruit chunks during the last few minutes of churning. At the point of serving, you can add 100’s n 1,000’s (aka sprinkles) as an additional topping.
- If you don’t have an ice cream maker, you can pour the mixture into a lidded container and freeze it, stirring every 30 minutes for the first few hours to break up any ice crystals until the desired consistency is reached.
This eggless vanilla ice cream recipe offers a smooth and creamy base, perfect for exploring various flavour combinations or enjoying on its own.
Custard Base Vanilla Ice Cream (using Eggs)
Ingredients:
- 250ml double cream (or whipping cream)
- 125ml whole milk
- 75g caster sugar
- 4 large egg yolks
- 2 teaspoons pure vanilla extract
Instructions:
- In a saucepan, combine the double cream and whole milk over medium heat. Heat the mixture until it starts to steam, but avoid boiling it.
- While the cream and milk are heating, whisk the egg yolks and sugar in a separate heatproof bowl until the mixture becomes pale and slightly thickened.
- Once the cream and milk are heated, slowly pour them into the egg yolk mixture, whisking continuously to combine. This process is known as tempering and ensures the eggs don’t scramble when mixed with the hot liquid.
- Pour the combined mixture back into the saucepan and cook over low to medium-low heat, stirring constantly, until the custard thickens enough to coat the back of a spoon. Be patient during this process, as it can take around 5-8 minutes. Avoid letting the custard come to a boil, as it may curdle.
- Once the custard has thickened, remove the saucepan from the heat and stir in the pure vanilla extract.
- Pour the custard through a fine-mesh sieve into a clean bowl. This step helps remove any cooked bits of egg and ensures a smooth texture for the ice cream base.
- Cover the bowl with plastic wrap, making sure the plastic touches the surface of the custard to prevent skin from forming. Refrigerate the custard for at least 4 hours or preferably overnight to chill thoroughly.
- Once the custard is well-chilled, pour it into an ice cream maker and churn according to the manufacturer’s instructions. This usually takes about 20-25 minutes, but the time may vary depending on your specific ice cream maker.
- (If you don’t have an Ice cream maker, check out our post How to Make Homemade Ice Cream: Without an Ice Cream Maker).
- The ice cream is ready when it reaches a soft, creamy consistency. If you prefer a firmer texture, transfer the churned ice cream into a lidded container and place it in the freezer for an additional 2-3 hours.
- Scoop the delectable egg custard-based ice cream into bowls or cones and enjoy it as is or pair it with your favourite toppings and desserts.
Note:
- This egg custard base provides a rich and creamy texture to the ice cream. If it suits you, then feel free to add mix-ins like chocolate chips, nuts, or fruit during the last few minutes of churning for added texture and flavour.
- If you don’t have an ice cream maker, you can still freeze the chilled custard in a lidded container, stirring every 30 minutes for the first few hours to break up any ice crystals until the desired consistency is reached.
As you can see. there’s not a lot in the different preparations, a little more work on the egg-based custard, but nothing too onerous with either.
Again, you’ll find what works best for you. Some say the egg Custard version is richer and creamier, but this comes down to personal preference based on time constraints and texture. Find what works best for you.
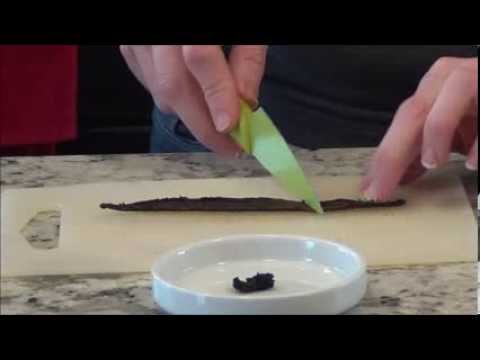
How to Extract Vanilla from a Vanilla Pod
Here is a general method for extracting vanilla from a vanilla pod:
 Cut the vanilla pod: Use a sharp knife to cut the vanilla pod in half lengthwise. If desired, leave a bit of the end intact to keep it together.
- Scrape out the seeds: Use the dull side of your paring knife to scrape out the seeds from the inside of the vanilla pod. The seeds are what contain the flavour and aroma of the vanilla.
- Combine with liquid: Add the scraped-out seeds and the vanilla pod to a liquid of your choice, such as milk or cream. You can also use alcohol, such as vodka or bourbon, to extract the vanilla flavour.
- Heat the mixture: Heat the mixture over low heat, stirring occasionally, until it reaches a simmer. This will help infuse the vanilla flavour into the liquid.
- Let it steep: Once the mixture has simmered, remove it from the heat and let it steep for at least 30 minutes or until it has reached the desired strength of flavour.
- Strain the mixture: Strain the mixture through a fine-mesh sieve to remove the vanilla pod and any other solids.
- Store the vanilla extract: Store the vanilla extract in an airtight container in the refrigerator or a cool, dark place. It will keep for several months.
Follow these simple steps and you’ve created pure Vanilla extract directly from a Vanilla pod that you can use in an array of Homemade Ice Creams, not just Vanilla.
And if like me, Vanilla pod flavouring doesn’t work for your needs, then you can use Vanilla Extract instead and just use the required ml/tsp as directed in whichever recipe you are following.
Ready to Make a Flavoured Ice Cream?
- Choose your recipe: There are many different recipes available for making homemade ice cream, ranging from classic vanilla to more unique flavours like peanut butter, lavender, or even Beetroot! Take a look at our Recipes & Methods (button at the top of the page) to choose a recipe that grabs your interest.
- Gather and Prepare the ingredients: Before you begin making the ice cream, make sure all the ingredients are at room temperature. This will help them mix more easily and create a smoother texture. If the recipe calls for any mix-ins like chocolate chips or fruit, chop them up and set them aside.
- Mix the ingredients: In a large mixing bowl, combine the ingredients according to the recipe instructions. Use a whisk or electric mixer to blend the ingredients until they are well combined and smooth.
- Chill the mixture: Once the ingredients are mixed, cover the bowl with plastic wrap and chill the mixture in the refrigerator for at least 2 hours or until thoroughly chilled. This will help the ice cream freeze more quickly and evenly.
- Churn the ice cream: Once the mixture is chilled, pour it into an ice cream maker and churn according to the manufacturer’s instructions. This will help incorporate air into the mixture and create a creamy texture.
- Add mix-ins: If the recipe calls for any mix-ins, add them to the ice cream during the last few minutes of churning. This will help distribute them evenly throughout the ice cream.
- Freeze the ice cream: Once the ice cream is churned, transfer it to a lidded container and freeze for at least 4 hours or until firm. This will help the ice cream set and become scoopable.
Follow these steps, add the extra flavours and you’ve just made your very own Homemade Ice Cream! There’s literally no stopping you now you’ve achieved this!
What are some Common Issues that can arise when Making Homemade Ice Cream?
There are some common issues that can arise during the ice cream-making process. Here are some of the most common issues and how to fix them:
 Ice crystal formation: Ice crystal formation is a common problem that can occur when making ice cream. This can happen if the ice cream mixture is not churned enough or if it is not frozen quickly enough. To prevent ice crystal formation, make sure to follow the recipe instructions carefully and churn the mixture until it is smooth and creamy.
- Soupy texture: If the ice cream mixture is too thin or not chilled enough, it can result in a soupy texture. To fix this issue, make sure to chill the mixture thoroughly before churning it in the ice cream maker. You can also add a small amount of cornflour to the mixture to help thicken it.
- Over-churning: Over-churning the ice cream mixture can result in a grainy or icy texture. To prevent this, make sure to follow the recipe instructions carefully and stop churning the mixture once it reaches a smooth and creamy consistency.
- Not letting the ice cream maker bowl get cold enough: If the ice cream maker bowl is not cold enough, the ice cream mixture may not freeze properly. To prevent this, make sure to freeze the bowl for the recommended amount of time before using it.
- Using dairy with a low-fat content: Using dairy with a low-fat content can result in ice cream that is less creamy and flavourful. To get the best results, use double cream or a mixture of double cream and whole milk.
- Overfilling the ice cream maker: Overfilling the ice cream maker can cause the mixture to overflow and make a mess. To prevent this, make sure to fill the ice cream maker no more than two-thirds full.
By being aware of these common issues and following the recipe instructions carefully, you’ll avoid some of the common issues people experience while making homemade ice cream.
How To Store Your Leftover Ice Cream to Enjoy Another Day
In the unlikely event that you ever find yourself with leftover ice cream, I mean who ever does? lol, then proper storage is key to maintaining its quality.
Here are some tips:
- Airtight container: Transfer your ice cream to an airtight container to prevent freezer burn and to keep it from absorbing any odours from the freezer. Press a piece of baking parchment or plastic wrap directly onto the surface of the ice cream before sealing the container.
- Freezer temperature: Store your ice cream in the coldest part of the freezer, ideally at -18°C or lower. This helps maintain its creamy texture and prevents it from becoming too hard.
- Thawing: When you’re ready to enjoy your leftover ice cream, let it sit at room temperature for a few minutes to soften slightly, making it easier to scoop.
- Shelf life: Homemade ice cream is best enjoyed within two weeks for optimal flavour and texture. After that, it may start to lose its freshness.
Adding Alcohol to Homemade Ice Cream
 Adding alcohol to homemade ice cream can be a tempting idea as it can introduce unique flavours and enhance the overall taste of the frozen treat. However, there are several challenges and considerations when incorporating alcohol into ice cream:
1. Alcohol Content and Freezing Point: Alcohol has a lower freezing point than water, and when added to ice cream, it can inhibit the freezing process. As a result, the ice cream might not freeze properly, leading to a softer consistency or even a slushy texture. This can be especially problematic if a significant amount of alcohol is used.
2. Ice Crystal Formation: Alcohol can interfere with the formation of ice crystals in ice cream. Large ice crystals can give the ice cream a grainy texture, detracting from its smooth and creamy appeal.
3. Flavour Balance and Intensity: The flavour of alcohol can be overpowering in ice cream, especially if the alcohol content is high. Finding the right balance of alcohol to other ingredients is essential to ensure the ice cream remains enjoyable and not excessively boozy.
4. Alcohol Evaporation: Alcohol tends to evaporate quickly, and when added to ice cream, it can cause the ice cream to lose some of its alcohol content and flavour over time.
5. Alcohol Interaction with Other Ingredients: Alcohol can interact with other ingredients in the ice cream base. It can potentially curdle the dairy or cause other ingredients to separate, leading to an undesirable texture and appearance.
6. Serving to All Ages: If you plan to serve the ice cream to a wide audience, including children and individuals who abstain from alcohol, it’s essential to be cautious with the amount of alcohol used.
Tips for Adding Alcohol to Ice Cream
- Use a moderate amount of alcohol: Generally, it’s best to use a modest amount of alcohol to avoid negatively impacting the texture and freezing point of the ice cream. A little can go a long way in adding flavour.
- Choose high-proof alcohol: If you want a stronger alcohol flavour with less liquid, consider using high-proof spirits that have a more concentrated flavour.
- Reduce alcohol content: Heat the alcohol gently on the cooker hob to evaporate some of the alcohol before adding it to the ice cream base. This can help preserve the flavour while reducing the freezing point challenges.
- Add alcohol towards the end of churning: To minimize evaporation, add the alcohol towards the end of the churning process, just before the ice cream reaches the desired consistency.
- What we tend to do is make a Vanilla base, get that to an almost set consistency, then add rum soak raisins right at the end and swirl those into the almost set Vanilla base. This way, we ensure we maintain the Ice Creams consistency. We do the same with Cherry Amaretto – create a vanilla base, then near the end of the churning process, when the Ice cream base is almost set, spoon the Amaretto pre-soaked Cherries, with an additional cherry coulis into the Vanilla base. This creates a beautiful swirl visually and bursts of flavours when you’re eating.
Check out our Article – The Art and Science of Blending Alcohol with Ice Cream – Frosted Fusions – which delves deeper into the science of blending Alcohol and Ice Cream.
Popular Alcohols in Ice Cream
 Some popular alcohols used in ice cream recipes include rum, bourbon, vodka, and liqueurs such as Grand Marnier or Amaretto. Experimenting with different alcohols can lead to exciting and flavourful combinations. **Be mindful not to get a lil tipsy whilst experimenting, this is a genuine warning from experience! Oh, a little dash more, and taste. No, not enough, let’s try some more, and taste… This process can go on for quite a bit and before you know it!
While adding alcohol to homemade ice cream can introduce incredible layers of flavours, it requires careful consideration to maintain the desired texture and taste. By using moderation and taking into account the challenges mentioned above, you can create a delectable and well-balanced alcoholic ice cream that is sure to be a hit with those who indulge in it.
So there you have it, you’re now set up. You’ve got all the knowledge and information you will need to make delicious, creamy, Homemade Ice Cream! The more you practice the more you’ll find your groove, and what works best for you and your family’s needs, taste requirements etc.
Whether you prefer egg custard-based ice creams, or Vanilla extract over Vanilla pod flavourings, only you can decide, the flavours, and taste combinations are endless. Unleash your Ice Cream Fantasies!
If you’d like to learn more about Making Ice Cream at Home, there is a vast amount of literature and books available online – Click on the link to see more: Making Ice Cream at Home.
Disclosure: This post contains affiliate links, which means that we may receive a commission if you make a purchase using these links. As an Amazon Associate, we earn from qualifying purchases.
Drop us a comment if you have any questions at all, we’ll be happy to help out and we look forward to hearing about your Homemade Ice cream endeavours.
Stay connected for more homemade ice cream inspiration! Join us for mouthwatering recipes, expert tips, and exclusive updates. Follow us on Pinterest, Instagram, Facebook, and X by clicking on any of the social media icons below.


Making ice cream is something that my whole family enjoys. I have been looking for a good but simple vanilla recipe that doesn’t have egg in it. I’m excited to try your recipe. I have never considered putting alcohol in ice cream but it seems like if it is added that it would be best to eat it right away? I don’t really mind soft ice cream but I don’t want any weird after tastes. I really learned a lot about making ice cream from this post.
Hey Marlinda,
Thanks for your comment. Great to meet a fellow Ice Cream Lover! We love ice cream too and I am so glad you found benefit from our post. I hope the eggless Vanilla recipe mentioned in the post is just what you are looking for. I’d love to hear how you get on when you try it out?
Alcohol in Ice cream can add so many layers in flavour profile, so it really is worth giving it a try. But as the post mentioned, some caution needs to be given whilst trying to incorporate alcohol. It certainly doesn’t need to be eaten right away, it will freeze, but it wont get as firm as ice cream without alcohol in it.
Re weird after tastes, I guess that will come down to your own preferences in flavours and what you choose to add, but generally if you’re adding flavours you personally like, there should be no after taste.
Thanks again for sharing your thoughts, please do let us know how you get on with that easy Vanilla recipe.
Keep cool and chilled :o)
Chezstar
Wow Cherie, healthy and delicious too! what a great article and you make icecream sound so simple where I thought it wasn’t!
Thank you for inspiring me to get into some flavour creations in the almond & cocounut milk icecreams, I’ll be reading more on your site and experimenting.
Can you tell me your favourite icecream flavour(s) with almond milk?
Hey Amanda,
Thanks for your comment and really glad you appreciated the article. Yes, Ice cream can be healthy and of course, delicious! It’s also a whole lot easier to make than most people realise. Our article – Learn To Make Homemade Ice Cream – A Beginners Guide – is a guide for beginners, listing all the basic processes required to start from scratch. Lots of hints and tips are shared.
Love to hear our articles inspire others to get creative. Our article – Homemade Dairy-Free & Lactose-Free Ice Cream Recipes – delves deeper into the use of alternative milk which you might find helpful too.
Hmm, Almond? I love our cherry Bakewell ice cream – we use almond milk to enhance the Bakewell flavour, check it out – Classic Cherry Bakewell: In a Homemade Ice Cream, also our cherry amaretto ice cream – An Indulgent Homemade Cherry Amaretto Ice Cream – almond milk works really well in both of these flavours.
If you have any further questions, please do get in touch.
Once again thanks for your comment and thoughts.
All the best
Cherie :o)