
Learn to craft homemade ice cream cones. Discover the secrets to perfecting these sweet treats at home.
We’ve shared various methods of making delicious homemade ice cream, all of which you can find under our ‘recipes and methods’ and ‘make your own’ menu tabs at the top of the screen, but no ice cream experience is truly complete without the perfect cone!
Whether you’re a seasoned ice cream enthusiast or just starting your frozen dessert journey, learning to craft your own homemade ice cream cones adds an additional and exciting string to your bow.
In this article, we’ll share some fascinating history as to how ice cream cones were first invented, and take you through the process, step-by-step of creating your own crispy, flavourful cones that perfectly complement your homemade ice cream creations. If you prefer you can skip straight to our easy to follow Ice Cream Waffle Cone recipe by clicking the link below, or read along to find out more.
Jump to Homemade Ice Cream Waffle Cones Recipe
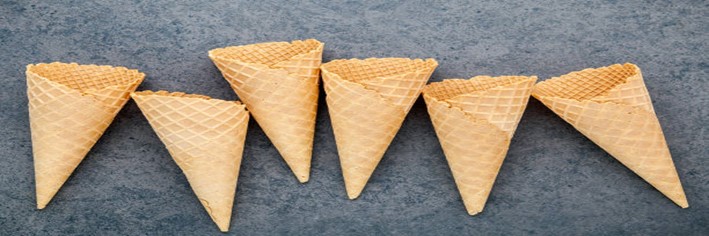
Making Ice Cream Cones: A Fun and Easy Adventure for All Ages
 Making ice cream cones—it’s far easier than you might think and so much fun. You definitely want to involve the kids in this enjoyable stage of your ice cream-making experience.
In fact, the fun and excitement are not just reserved for the kids, I still get a thrill out of watching that cone taking shape and holding its shape, then waiting for it to cool and set so I can fill it with my newest ice cream experiment and scoff it, ahem, I mean eat it and enjoy!
Crafting your own ice cream cones not only allows you to tailor them to your taste but also adds an extra layer of excitement to your homemade ice cream making.
Whether you’re creating classic sugar cones, waffle cones, or exploring inventive flavours, exactly the same as when you’re making your own homemade ice cream, this hands-on activity is perfect for family fun and for creating lasting memories.
Cone-venient Origins: The Story of the Ice Cream Cone’s Invention
Before we get into the nitty gritty of making ice cream cones, we’d like to share with you how ice cream cones first came about, in an unexpected, but incredibly innovative way.
The ice cream cone is believed to have been invented during the 1904 St. Louis World’s Fair, also known as the Louisiana Purchase Exposition.
At the fair, an ice cream vendor named Arnold Fornachou ran out of paper dishes to serve his ice cream.
In a moment of ingenuity, he turned to a neighboring waffle vendor, Ernest Hamwi, who rolled one of his waffles into a cone shape to hold Fornachou’s ice cream. This makeshift creation was an instant hit, providing a convenient and edible container for the ice cream.
Seeing the popularity of this new way to enjoy ice cream, other vendors began to replicate it, and the ice cream cone was born. It quickly gained popularity and became a staple in the world of ice cream.
Since then, ice cream cones have evolved into various shapes and flavours, including sugar cones, waffle cones, and even chocolate-dipped cones. They continue to be an essential part of the ice cream experience enjoyed by people of all ages around the world.
What an ingenious and quick-thinking resolution to the problem at hand! It’s amazing how something so simple and cone-venient has been used to such great effect and adopted worldwide.
Let’s get started making our own waffles and turn them into ice cream cones.
Homemade Ice Cream Waffle Cones Recipe
Here’s our waffle-y versatile Ice Cream Cone recipe and method
 Ingredients:
- 225g plain flour
- 115g granulated sugar
- 1/4 teaspoon salt
- 2 large eggs
- 55g unsalted butter, melted and cooled
- 1/2 teaspoon vanilla extract
- 120ml whole milk
- Cooking spray or additional melted butter (for the waffle iron)
Instructions:
- Prepare the Batter:
- In a mixing bowl, whisk together the flour, sugar, and salt.
- In another bowl, whisk the eggs, melted butter, vanilla extract, and milk until well combined.
- Combine Wet and Dry Ingredients:
- Gradually pour the wet ingredients into the dry ingredients while stirring. Mix until you have a smooth, thin batter. Let the batter rest for about 15 minutes. This is a great time to explain to the kids how the ingredients come together to create the batter. Every moment in the kitchen is a chance to educate and teach our kids, whilst spending quality time with them.
- Preheat the Waffle Maker:
- Preheat your waffle maker according to the manufacturer’s instructions. Make sure it’s hot before you start cooking the cones. Be cautious, as the waffle maker can get very hot, so this step should be handled by adults.
- NB: if you don’t own a Waffle/Ice Cream Cone Maker – fear not! We’ve provided a method below for you to try out. See, we told you a waffle-y versatile recipe and method!
- Preheat your waffle maker according to the manufacturer’s instructions. Make sure it’s hot before you start cooking the cones. Be cautious, as the waffle maker can get very hot, so this step should be handled by adults.
- Cook the Cones:
- Lightly grease the waffle maker with cooking spray or a brush of melted butter.
- Pour a small amount of batter onto the center of the waffle maker (about 2 tablespoons for smaller cones or 4 tablespoons for larger ones). Quickly close the waffle maker and cook until the cones are golden brown. This is where kids can get involved under adult supervision. They can carefully pour the batter, but be sure to keep their hands away from the hot waffle maker.
- Shape the Cones:
- As soon as the waffle is done, carefully remove it with a spatula. Place it on a clean kitchen towel or greaseproof paper.
- While the waffle is still warm, quickly roll it into a cone shape. Kids can help with this part, but be sure to warn them about the heat.
- Hold and Cool:
- Hold the cone in the rolled shape for a few seconds until it sets. Kids can help with this step, but again, they should be cautious about the heat that will be coming off the waffle, soon-to-be ice cream cone.
- Repeat:
- Continue making cones with the remaining batter, re-greasing the waffle maker as needed.
- Serve and Enjoy:
- Once the cones have cooled and set, fill them with your favourite ice cream. Kids can have lots of fun scooping their favourite ice cream flavours into the cones.
Now, you have homemade ice cream cones that you and the kids can enjoy together! Remember to prioritise safety when dealing with hot surfaces and involve the kids in the safer, non-heat-related steps of the process.
No Waffle Maker? No Problem! Here’s Your Alternative Method
You can still make ice cream cones even if you don’t have a waffle maker. Here’s an alternative method using a non-stick skillet or frying pan:
 Ingredients:
The ingredients are exactly the same as above, however, we’ve listed them again for convenience.
- 225g plain flour
- 115g granulated sugar
- 1/4 teaspoon salt
- 2 large eggs
- 55g unsalted butter, melted and cooled
- 1/2 teaspoon vanilla extract
- 120ml whole milk
- Cooking spray or additional melted butter
Instructions:
- Prepare the Batter: Follow steps 1 and 2 from the previous recipe to prepare the batter.
- Preheat the Skillet: Place a non-stick skillet or frying pan on the hob over medium-low heat. Allow it to heat up, and then lightly grease it with cooking spray or melted butter.
- Cook the Cones: Pour a small amount of batter into the skillet, swirling it around to create a thin, even layer. You can use the back of a spoon to help spread the batter. Cook until the edges start to turn golden brown, and the batter is set, similar to cooking a crepe or pancake.
- Shape the Cones: As soon as the batter is set, carefully lift the edge of the cone using a spatula. If you have a cone mold, you can shape it around the mold to create a cone shape. If not, you can shape it into a cone by rolling it around a clean, cone-shaped object like a funnel or a cardboard cutout.
- Hold and Cool: Hold the cone in the rolled shape for a few seconds until it sets. Be cautious, as it will be hot. Kids can help with this step, but they should be aware of the heat.
- Repeat: Continue making cones with the remaining batter, re-greasing the skillet as needed.
- Serve and Enjoy: Once the cones have cooled and set, fill them with your favourite ice cream and devour!
This method allows you to make ice cream cones without a waffle maker, and it’s a great way to involve kids in the process. Just remember to prioritise safety when handling hot surfaces and involve the kids in the safer, non-heat-related steps.
Enhance Your Waffle Mix with Exciting Flavours
Elevate your homemade ice cream cones by adding tasty flavours to your waffle mix. Get creative and try different unique ingredients.
Here are some ideas to inspire you:
- Cocoa Delight: Mix in cocoa powder to create rich chocolate waffle cones.

- Zesty Citrus: Add grated orange or lemon zest for a refreshing citrus twist.
- Nutty Indulgence: Incorporate finely chopped nuts like almonds or pecans for a textural crunch.
- Fruity Bliss: Stir in dried fruit bits like raisins, cranberries, or chopped dried apricots for bursts of sweetness.
- Spice It Up: Sprinkle ground cinnamon, mixed spice, or nutmeg into the mix for a warm, aromatic spice flavour.
- Vanilla Elegance: For a classic touch, add a dash of pure vanilla extract to your waffle batter.
- Maple Infusion: Drizzle maple syrup directly into the mix for a subtle sweetness reminiscent of pancakes.
Feel free to combine these flavourings or create your own unique combinations. The possibilities are endless.
The Sweet Surprise: Chocolate Chunk!
This is without a doubt my favourite part of enjoying an ice cream, the chocolate chunk at the bottom of the cone!
That’s not to say I don’t love my homemade ice creams or my homemade cinnamon waffles, as I like to spice mine up, but that chocolate chunk, that last bite of the cone!
It’s a brilliant idea whoever first thought of doing that, making your ice cream experience even more indulgent.
Here’s how it works: Melt chocolate and pour a dollop into the bottom of the cone and allow it to set. You load up your cone with delicious homemade ice cream. Then you start to enjoy and with each bite, it gets tastier, and the best part is when you reach the luxurious chocolate surprise at the end. It’s a delicious end to an already delicious ice cream treat.
It’s the cherry on the cake, or in this instance, the chocolate chunk in the cone, elevating your ice cream experience to a whole new level of indulgence.
Chocolate Chunk Method:
We’re not going to leave you hanging with that thought and not show you how you too can enjoy this element!
Here’s how you can add your chocolate chunks!
- 115g of high-quality dark chocolate

- Prepare the Ingredients:
- 115g of high-quality dark chocolate (roughly chopped)
- Ice cream cones (as per your preferred recipe)
- Double Boiler Setup:
- Fill a small saucepan with an inch of water and place it over low heat.
- Place a heatproof bowl (preferably stainless steel) over the saucepan, ensuring it doesn’t touch the water. This creates a makeshift double boiler.
- Melt the Chocolate:
- Add the chopped dark chocolate to the heatproof bowl.
- Gently stir the chocolate with a spatula or wooden spoon as it melts. Be patient and avoid overheating; dark chocolate can easily scorch.
- Once the chocolate is smooth and fully melted, remove it from the heat.
- Fill the Cones:
- Once the chocolate is smooth, take a teaspoon and drizzle the melted chocolate into the bottom of each ice cream cone. You want to create a small chocolate pool at the very bottom of the cone.
- Allow the chocolate to set and harden before adding your ice cream. This will create an exciting surprise at the end of your ice cream cone adventure!
- Of course, you’re not limited to just the chocolate chunk, you can also dip each cone in the smooth chocolate to create a chocolate-clad cone. There really are no limits!
- Chill and Set:
- Place the chocolate cones on a tray lined with parchment paper to prevent sticking.
- Let them sit at room temperature for a few minutes to allow the chocolate to slightly firm up.
- Afterward, transfer the tray to the refrigerator for about 15-20 minutes or until the chocolate completely sets.
- Enjoy the Sweet Surprise:
- Once the chocolate is firm, fill the cones with your favorite ice cream flavours.
- As you enjoy your ice cream, savour the chocolatey surprise waiting at the bottom.
Adding a chocolate chunk to the base of your ice cream cones not only enhances the taste but also provides an unexpected textural contrast, from the soft, sweet ice cream. It’s a simple yet effective way to take your homemade cones to the next level of deliciousness. Enjoy!
Waffle Makers: The Scoop on the Pros and Cons
Waffle makers are essential tools in the art of crafting homemade ice cream cones. While they offer many advantages, they also come with a few limitations. Let’s break down the pros and cons to help you decide if a waffle maker is your ideal choice for creating ice cream cones.
Pros:
- Distinctive Patterns: Waffle makers create those iconic grid patterns on your ice cream cones, adding a touch of nostalgia to your desserts.
- Getting Personal: One of the standout pros is their versatility in creating different waffle shapes and patterns. This feature allows you to personalise your waffles, making them unique to your preferences. Whether you prefer classic waffle designs or want to get creative with custom shapes, waffle makers enable you to do this.
- Consistent Shape: With various cone shapes and design options, you can achieve uniformity and precision in your creations.
- Quick and Efficient: Most waffle makers produce cones within minutes, making the process efficient and time-saving.
Cons:
- Specialised Equipment: You’ll need a waffle maker specifically designed for cones to achieve the desired shape. This can be an additional expense if you don’t already own one.
- Limited Versatility: Waffle makers are primarily intended for cone production. Unlike skillets or frying pans, they may not be as versatile for other cooking tasks.
- Potential for Waste: Like with any kitchen appliance, you’ll need to ‘get to know’ your Waffle Maker. They are prone to burning and can on occasion cook unevenly and with that, you can end up with cones that are inedible. Of course – we’re not talking culinary Michelin-starred waffles here. We’ve certainly had plenty of cones that had a segment missing here or there with plenty of rough edges! It’s all part of the perfectly imperfect fun of homemade waffle making!
Overall, waffle makers offer precision and convenience for making ice cream cones, allowing you to achieve those classic patterns and shapes. However, they are specialised equipment and may not be as versatile as other cooking tools.
Consider your specific needs and preferences before deciding on the right method for your homemade cones.
Crafting Ice Cream Cones Your Way: No Extra Gear Required, But If You’re Interested…
Disclosure: This post contains affiliate links, which means that we may receive a commission if you make a purchase using these links. As an Amazon Associate, we earn from qualifying purchases.
Making your own homemade ice cream cones is an enjoyable journey that doesn’t demand any special equipment.
You can create delicious, perfect, or imperfect cones with just a few common kitchen tools. However, for those eager to explore additional options and streamline the process, we’ve gathered some quick and convenient links below.
These links provide easy access to the items you might need to enhance your ice cream cone-making experience. Whether you prefer a no-fuss approach or are excited to equip your kitchen, we’ve got you covered.
Essential Accessories and Appliances:
We’ve listed below a selection of items you will require to make ice cream, waffle cones, etc. Just click on the provided links to see the options available.
- Waffle Makers: Discover a variety of waffle makers tailored for crafting those delightful cone patterns.
- Cone Shapers: Achieve uniformity and precision in your cones with specialized cone shapers.
- Ice Cream Machines: If you’re looking to take your ice cream-making skills to the next level, explore ice cream machines for creating delicious frozen treats.
- Additional Accessories: Don’t forget about handy accessories like scoops, toppings, and serving dishes to complete your ice cream cone experience.
- Double Boilers: As described above, you can easily recreate your own double boiler set-up, but you can also have your own for many kitchen uses.
- Aprons: Generally if you’re encouraging the kids to help, you need aprons on hand!
By clicking on these links, you’ll have everything you need to become a master at crafting homemade ice cream waffle cones. Get ready to delight your taste buds and impress your friends and family with your deliciously indulgent creations!
If you head on over to our article – What do you need to make Homemade Ice Cream? – We’ve listed all the items you might need, although most kitchens should have most items necessary to create these delicious homemade goodies!
We truly hope you have enjoyed our article and the journey we’ve been on crafting and creating our own homemade Ice Cream Cones. Now it’s time to get them filled and devoured.
If you have any questions, please drop us a comment below. We would absolutely love to hear from you regarding your own ice cream cone-making experiences.


HI!
What a delightful and comprehensive guide to making homemade ice cream cones! I love the detailed instructions and the historical tidbits about the invention of the ice cream cone—it makes the process even more interesting. The tips for adding unique flavors to the waffle mix and the idea of including a chocolate chunk at the bottom of the cone are fantastic touches that I can’t wait to try.
I’m curious, though. My grandchildren are gluten sensitive and one granddaughter has celiac disease —have you experimented with any gluten-free recipes for the cones? If so, how did they turn out? Also, how would these recipes work with sugar substitutes?
Hey Scott,
Thank you for dropping by and for sharing your thoughts and positive feedback. Really glad that you appreciated our guide to making homemade Waffle Ice Cream Cones.
The extra flavours are always nice to add something more and the chocolate chunk, well that’s a must! We wanted to make sure we had provided directions on the whole process.
Hmm, interesting question – gluten-free waffle cones. No, I have not tried these, but I am going to start on that process straight away and try out a few options, please do check back in and we’ll have an update on this very soon.
Regarding sugar substitutes, please head over to our article – Balancing Flavour and Health: Natural Sweeteners and Homemade Ice Cream – which provides information on a selection of natural alternatives you can use in place of regular sugar.
Thanks for your comment and question on the Gluten-free options, my brain is ticking over now with ideas on how I can make these waffle cones even more inclusive for those with alternative dietary requirements.
Hoping to get an update posted very shortly!
Appreciate your comment and thoughts.
Wishing you all the best,
Cherie :o)