
Discover how to make luscious homemade honeycomb ice cream with our easy recipe. Enjoy the fun of creating a honeycomb from scratch and indulge in a delicious treat.
Making your own honeycomb ice cream at home is not only a delicious homemade treat but also incredibly easy and a lot of fun! You have the excitement of creating your own golden, crunchy honeycomb from scratch, and then folding it into creamy, homemade ice cream for a delicious treat that the whole family will enjoy.

The combination of the sweet, brittle honeycomb and rich, smooth ice cream is a treat that will leave everyone wanting more. Whether you’re a seasoned chef or a kitchen novice, this honeycomb ice cream recipe will have you whipping up a mouth-watering dessert that’s perfect for any occasion.
In this article, we will take you through the process of creating your own Honeycomb and then incorporating that into your own homemade ice cream with our east-to-follow guides.
If you’d prefer to jump straight to our recipe and method, click on the link, otherwise read on.
Jump to our Homemade Honeycomb Recipe
Jump to our Homemade Honeycomb Ice Cream Recipe
Making Honeycomb Like a Pro!
Have you ever seen a video or cooking program clip where you see honeycomb being made?
There’s that point where the bicarbonate of soda is added, and it immediately starts to react with the caramel, bubbling and increasing in size. It’s both exciting and alarming at the same time, lol.
The magic behind this reaction lies in the bicarbonate of soda, which releases carbon dioxide gas when it comes into contact with the hot sugar syrup. This gas forms bubbles, creating the characteristic light and airy texture of honeycomb. The rapid expansion and cooling of the mixture result in a crunchy, golden treat that’s as fun to make as it is to eat.
Fun for the Whole Family
 This is something you can get the kids involved with! Not only are you creating a delicious treat, but there’s also an opportunity for them to learn the science behind the process of making honeycomb, making it educational too.
As they watch the bicarbonate of soda react with the caramel, turning the mixture into a bubbling, expanding marvel, they’ll be witnessing a real-life chemistry lesson in action.
It’s a fantastic way to engage their curiosity and make learning fun. Plus, they’ll love the hands-on experience and the satisfaction of tasting their own homemade honeycomb ice cream.
Note: While this is a fun activity, it’s important to exercise caution when working with hot sugar. Ensure children are supervised at all times, and take care to avoid any accidents. The sugar mixture can reach very high temperatures, so use caution and follow safety guidelines to prevent burns or injuries.
It’s Far Easier Than You Might Think
You might feel a little intimidated by the process but be assured making honeycomb is far easier than you might think. It’s quite addictive actually, and once you master your first batch, you’ll likely try it again and again to watch that reaction from the bicarb and caramel taking place.
So, what will you need? You’ll probably find you already have most of the equipment you need right in your kitchen. Here’s a list:
Equipment:
- A heavy-bottomed saucepan
- A sugar thermometer (optional but very helpful)
- A wooden spoon
- A baking tray
- Baking parchment or a silicone mat
- Measuring spoons
- A heatproof bowl
With these basic tools, you’re all set to create your own honeycomb!
If you find you are missing any of the above, head on over to our article – What Equipment Do You Need To Make Homemade Ice Cream? – Frosted Fusions – which lists everything you might need along with useful links.
No Honey or Combs Required!
You might be wondering why it’s called “honeycomb” when there’s no honey or combs involved. There literally is no link, as you don’t even use honey, instead golden syrup which is a byproduct of the sugar refining process.
There’s no direct link to bees and their honey in this sweet treat that is honeycomb. It’s likely that the name “honeycomb” likely stems from its resemblance to the intricate, hexagonal pattern of natural honeycomb created by bees.
While the look and patterns are replicated, the ingredients and process are entirely different.
Did You Know:
 Regional Variations:
Different regions have their own variations of honeycomb candy. In the UK, it’s commonly called cinder toffee, while in New Zealand and Australia, it’s known as hokey pokey.
Despite the different names, the basic recipe remains the same. Now we’ve got that cleared up and you’ve got the equipment needed, let’s get into it.
Homemade Honeycomb Recipe
This is a very simple and easy-to-follow recipe and in no time you’ll have made your own honeycomb cooling and ready to combine it into your homemade ice cream.
 Ingredients:
- 200g granulated sugar
- 5 tablespoons golden syrup
- 2 teaspoons bicarbonate of soda
Method:
- Prepare Your Tray:
Line a baking tray with baking parchment or a silicone mat and set it aside. - Heat the Sugar and Syrup:
In a heavy-bottomed saucepan, add the granulated sugar and golden syrup. Stir together just enough to combine. - Melt and Boil:
Place the saucepan over a medium heat. Without stirring, allow the sugar and syrup to melt, and then bring the mixture to a boil. If you have a sugar thermometer, aim for a temperature of around 150°C (300°F). If not, you’ll know it’s ready when the mixture turns a deep golden colour, usually after 4-5 minutes. - Add the Bicarbonate of Soda:
Remove the saucepan from the heat and quickly add the bicarbonate of soda. Stir briskly but gently with a wooden spoon as the mixture foams up rapidly. - Pour and Set:
Immediately pour the foamy mixture onto your prepared baking tray, spreading it out slightly if needed. Be careful as the mixture will be very hot. - Cool:
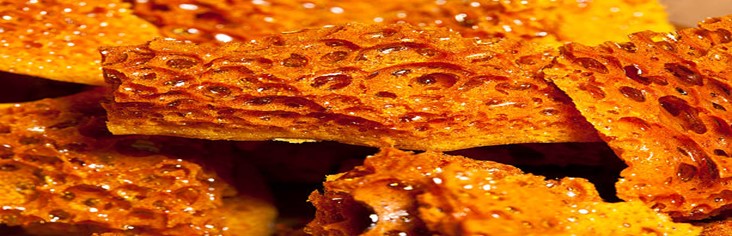
Let the honeycomb cool completely for about an hour. Once set, break it into bite-sized pieces.
Now, you’re ready to fold this delicious homemade honeycomb into your ice cream base, creating a delicious treat that’s perfect for any occasion.
Homemade Honeycomb Ice Cream Recipe
As with all homemade Ice Cream, you have endless possibilities for customisation.
You can start with a classic vanilla base for a timeless treat, or experiment with a rich caramel base for an extra indulgent twist. Then, add crushed honeycomb at the end for a delicious surprise in every bite, or incorporate it into the ice cream base itself to enhance the honeycomb flavour.
The choice is yours, and each variation promises a delicious homemade dessert that will leave everyone craving more.

Ingredients:
- 500ml double cream
- 300ml whole milk
- 150g granulated sugar
- 4 large egg yolks
- 1 teaspoon vanilla extract (for vanilla base)
- 100g crushed honeycomb (for mixing into the ice cream)
- Additional crushed honeycomb for topping (optional)
Method:
- Prepare the Ice Cream Base:
- In a saucepan, combine the double cream and whole milk. Heat the mixture over medium heat until it just begins to simmer. Remove from heat.
- Whisk the Sugar and Egg Yolks:
- In a separate bowl, whisk together the granulated sugar and egg yolks until pale and creamy.
- Temper the Eggs:
- Slowly pour the hot cream mixture into the egg mixture, whisking continuously to prevent the eggs from curdling. This process, called tempering, ensures a smooth custard base.
- Return to the Heat:
- Pour the combined mixture back into the saucepan and return it to the stove over low heat. Cook gently, stirring constantly, until the custard thickens and coats the back of a spoon. Be careful not to let it boil.
- Flavour Variation:
- At this point, you can add vanilla extract for a classic vanilla base, or you can stir in caramel sauce for a decadent caramel base. Adjust the flavourings according to your preference.
- Chill the Custard:
- Once the custard has thickened, remove it from the heat and transfer it to a clean bowl. Cover the surface with cling film to prevent a skin from forming, then refrigerate until completely chilled, preferably overnight.
- Churn the Ice Cream:
- Pour the chilled custard into an ice cream maker and churn according to the manufacturer’s instructions until it reaches a soft-serve consistency.
- NB: If you don’t have an ice cream maker, you can still make this recipe. Pour the mixture into a freezer-safe container and freeze. Every 30 minutes, stir the mixture vigorously with a fork to break up any ice crystals that are forming, repeating this process for about 3-4 hours or until the ice cream is firm. Please also check out our post – Homemade Ice Cream: Without an Ice Cream Maker – to learn more.
- Pour the chilled custard into an ice cream maker and churn according to the manufacturer’s instructions until it reaches a soft-serve consistency.
- Incorporate the Honeycomb:
- During the last few minutes of churning, add the crushed honeycomb into the ice cream mixture. Alternatively, you can fold the honeycomb into the churned ice cream by hand for larger, more distinct pieces.
- Freeze and Serve:
- Transfer the churned ice cream into a freezer-safe container, layering it with additional crushed honeycomb if desired. Freeze for at least 4 hours or until firm.
- Enjoy:
- Serve scoops of homemade honeycomb ice cream in cones or bowls, topped with extra crushed honeycomb for added crunch and sweetness. Enjoy the creamy texture and irresistible flavour of this homemade delight!
With these simple steps, you can create your own delicious honeycomb ice cream at home, experimenting with different flavours and textures to suit your taste preferences.
Whether you choose to mix the honeycomb into the base or use it as a topping, each spoonful is sure to be a delicious treat.
We hope that you have enjoyed our article – Homemade Honeycomb Ice Cream: A Sweet Treat For All Ages and we especially hope that we have inspired you to give this fun recipe a go.
Drop us a comment below if you have any questions and of course, we would love to hear back from you with your honeycomb ice cream experiences.
Stay connected for more homemade ice cream inspiration! Join us for mouthwatering recipes, expert tips, and exclusive updates. Follow us on Pinterest, Instagram, Facebook, and X by clicking on any of the social media icons below.


I already got excited from the title of this post and from reading the introductory sentences because I like ice cream and I like honey. I even use honey in my tea and beverages more frequently than sugar these days. I actually laughed out loud when I got to the point in the post where it explained that neither honey nor combs were needed to make this treat. And yes, I asked the question; so why is it called Honeycomb Ice Cream?
I enjoyed the part about getting children involved in the preparation. They get to be active in the kitchen, watch a fun, real life and practical chemical reaction and can enjoy the satisfaction of being an active part of creating a delicious home made treat. The picture of the final product showed how yummy this treat will look. I can’t wait to prepare it and to taste it.
Thank you for this practical, yet fun-to-read article.
Hey Oluseyi,
Thanks for your comment and for sharing your thoughts. Really glad that you appreciate ice cream and honey and yes, there is no honey in honeycomb! lol, but still super delicious nonetheless.
It’s a great activity to share with the whole family and the kids really do love getting involved, learning whilst creating and of course, the joy of eating their creation at the end is always something special.
Would love to hear how you get on making this and if you have any questions, please don’t hesitate to send us a message.
If you’re partial to Honey in your ice cream, check out our article – Lavender and Honey Ice Cream: A Unique and Fragrant Fusion – which is full of sweet honey notes.
Thanks again for dropping by.
All the best
Cherie :o)
Wow…I can’t wait to make this with my grandson. I had never heard of honeycomb before reading this article and I see I have been missing something special. Is this a dessert that is popular in the UK? I noticed the measurements were not in cups. I appreciated the precautions about getting burned…anything hot that bubbles can lead to burns. Also nice that you made a list of everything needed. My grandmothers made pies and my mother made only a few kinds of cake. So I was definitely deprived! I have personally never made ice cream, and that also seems like it wouldn’t be too difficult. Thanks for a fun and interesting idea for sweet-making that can be a family affair!
Hey Linda,
Thanks for your comment and positive feedback. Glad to read that you enjoyed our article about Honeycomb Ice Cream. Like many desserts, they have different names in different regions, I believe this is called Sponge Candy in the US, or Seafoam Candy. Perhaps those are names you are more familiar with?
Indeed the article provides ingredients with UK measurements, the conversion is as follows;
500ml double cream: approximately 2 cups heavy cream
300ml whole milk
:approximately 1 1/4 cups whole milk
150g granulated sugar
:approximately 3/4 cup granulated sugar
4 large egg yolks
:4 large egg yolks (no conversion needed)
1 teaspoon vanilla extract
:1 teaspoon vanilla extract (no conversion needed)
100g crushed honeycomb
:approximately 3.5 ounces crushed honeycomb
Additional crushed honeycomb for topping
:optional amount as desired
Hope this helps and makes it easier for you to try this out with your grandson! It truly is a wonderful ice cream flavour and certainly a great deal of fun can be had making it, of course, with care as detailed in our article.
We have a beginner’s guide to making ice cream, which provides all the instructions needed to make delicious homemade ice cream if you’ve not tried making it before.
Check it out – Learn To Make Homemade Ice Cream – A Beginners Guide – it will take you through the process,. step-by-step.
Once again, thank you for dropping by and for sharing your thoughts.
All the best
Cherie :o)