Learn how to make creamy vegan ice cream at home with our step-by-step guide & recipe. Tips, mix-ins, no-churn method & flavour twists included!
Think vegan ice cream can’t be rich, indulgent, and irresistibly creamy? Think again.
With the right ingredients, a few easy techniques, and a sprinkle of creativity, you can make dairy-free ice cream that has friends saying, “Wait… this is vegan?”
Whether you’re in it for the health benefits, dietary needs, or just love trying plant-based twists on classic treats, this guide will walk you through making your own dreamy vegan scoops — no compromise on texture or flavour.
✅ In This Article, You’ll Find:
- The Evolution of Vegan Desserts
- How to choose the best plant-based milk for creaminess
- Natural sweeteners that balance flavour without overpowering
- The simple stabilisers that keep vegan ice cream smooth
- Flavour and mix-in ideas to create your signature scoop
- Freezing techniques (with or without an ice cream maker)
- Presentation tips to wow your family and friends
- A full step-by-step recipe for creamy vegan vanilla bean ice cream (plus flavour twist variations!)
How Vegan Desserts Have Evolved
A decade ago, vegan desserts had a bit of a reputation — often icy, bland, or full of mystery ingredients. But those days are gone. Advances in plant-based milks, natural sweeteners, and stabilisers mean vegan ice cream now rivals dairy in creaminess and taste.
People choose vegan for many reasons — ethical (avoiding animal products), environmental (reducing carbon footprint), or dietary (lactose intolerance, allergies, or health goals).
Whatever the reason, today’s options mean you can indulge without feeling like you’re “missing out.” In fact, with the right recipe, most people wouldn’t even know the difference… almost.
How to Make the Creamiest Vegan Ice Cream
Vegan ice cream is more than just a substitute — it’s a dessert in its own right. The secret is balancing plant-based creaminess, natural sweetness, and smooth texture so your scoops rival (or even beat) dairy.
Here’s our step-by-step guide to help you achieve the creamiest, “hard-to-tell-the-difference” vegan ice cream at home — plus an easy recipe to get you started.
1️⃣ Start with the Perfect Base
Your base is the heart of your ice cream — it’s where all the magic begins.
Plant-based milks like coconut, almond, oat, or cashew each bring unique creaminess and flavour notes:

- Coconut milk: rich and tropical
- Cashew milk: buttery and smooth
- Oat milk: subtly sweet and comforting
- Almond milk: light with a nutty edge
💡 Pro tip: Try blending two types (like oat + coconut) for the best of both worlds.
2️⃣ Sweeten Naturally
Skip refined sugar overload and opt for natural sweeteners like maple syrup, agave, or date syrup. They’ll give you balanced sweetness without overshadowing your chosen flavours.
3️⃣ Stabilise for Silkiness
No one likes icy vegan ice cream. That’s where stabilisers like agar-agar or xanthan gum step in — helping your ice cream stay smooth and scoopable, even after a few days in the freezer.
4️⃣ Infuse Flavour Like a Pro
From vanilla bean specks to fresh fruit purees or cacao, use natural flavour boosters for depth and aroma.
Consider these combo’s:
- Raspberry + dark chocolate
- Peanut butter + banana
- Salted caramel + coconut
5️⃣ Get Creative with Mix-Ins
Fold in chopped nuts, chocolate chunks, cookie crumbles, or swirls of fruit coulis for texture and flair. This is your “signature” moment — no swirl is too bold!
6️⃣ Freeze & Serve
If you have an ice cream maker, let it churn and do its magic — you’ll get the creamiest results with minimal effort.
No ice cream maker? No problem.
- Blend your base until smooth and well-combined.
- Pour it into a freezer-safe shallow container.
- Freeze for 45 minutes initially, then remove and whisk vigorously with a fork or hand mixer to break up ice crystals.
- Return to the freezer, repeating the whisk-and-freeze step every 30–45 minutes for about 3–4 hours, until it reaches a creamy consistency.
Once your ice cream is set (after at least 4 hours total freezing), let it soften at room temperature for 5–10 minutes before scooping.
Serve in cones or bowls piled high with fresh fruit, shredded coconut, or mint.
Storage tip: Keep your vegan ice cream in an airtight, freezer-safe container with a piece of baking parchment pressed directly onto the surface before sealing. This reduces freezer burn and helps maintain that smooth, creamy texture for up to 2 weeks.
👉🏽 Don’t have an ice cream maker, but thinking about buying one? Not sure which one would suit you best? Head over to our article – What is the Best Ice Cream Maker? A Detailed Review. This provides information and guidance on what you want to look for in an ice cream maker and reviews a selection of appliances.
7️⃣ Pair for Maximum Impact
Serve your vegan ice cream alongside vegan brownies, sandwich between cookies, or spoon over a warm fruit crumble for a melt-meets-crunch moment.
Ready to give it a go? Below is our easy Vegan ice cream recipe, with full step-by-step guidance.
Creamy Vegan Vanilla Bean Ice Cream Recipe
(Prep time: 15 mins (plus soaking time if needed) | Churn time: 25–30 mins (or freeze/stir method) | Total time: 4 hours 45 mins (including freezing) | Servings: 6)
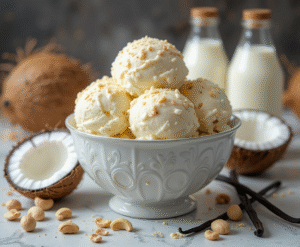 Ingredients:
- 400ml full-fat coconut milk (chilled)
- 200ml cashew milk (unsweetened)
- 120g maple syrup or agave nectar
- 1 vanilla bean (split & seeds scraped) or 2 tsp pure vanilla extract
- 1 tsp xanthan gum (or 2 tsp arrowroot powder)
- Pinch of fine sea salt
Method:
- In a medium saucepan, whisk together coconut milk, cashew milk, maple syrup, vanilla seeds, and salt.
- Sprinkle in xanthan gum while whisking constantly to avoid lumps.
- Warm over medium heat until just steaming (don’t boil), whisking until smooth.
- Remove from heat, transfer to a jug or bowl, cover, and chill in the fridge for at least 2 hours.
- If using an ice cream maker: Churn according to the manufacturer’s instructions until thick and creamy.
- If no ice cream maker: Pour into a freezer-safe dish, freeze for 45 mins, stir vigorously with a fork, then repeat every 30 mins for 3–4 hours until set.
- Let the ice cream sit at room temperature for 5 mins before scooping for the perfect texture.
Serving Suggestion:
- Top with fresh berries, vegan chocolate shavings, or a drizzle of espresso for an affogato-style twist.
Nutritional info (per serving):
- Calories: ~215 kcal | Fat: 13g | Carbs: 22g | Sugar: 18g | Protein: 2g
Flavour Twists to Try
Once you’ve mastered the Creamy Vegan Vanilla Bean Ice Cream base, you can have some fun with other flavour combinations.
Here are two simple but crowd-pleasing ideas that add colour, texture, and a whole lot of summer energy.
🍫 Chocolate Fudge Swirl
- Prepare the vanilla base as per the recipe.
- In a small pan, gently heat 100g vegan dark chocolate with 50ml coconut cream until smooth. Cool slightly.
- Once your ice cream is churned (but still soft), drizzle the chocolate sauce in thin ribbons and lightly fold to create swirls — don’t overmix or you’ll lose the marbling.
- Freeze until scoopable.
Tastes like: Chocolate-dipped vanilla dreams.
🥭 Mango Ripple
- Blend 200g ripe mango with 1 tbsp lime juice and 1 tbsp agave syrup until silky smooth.
- After churning your vanilla base, spoon the mango purée over the top in dollops.
- Use a skewer or butter knife to ripple it through for a sunburst effect.
- Freeze until firm.
Tastes like: A tropical holiday in a cone.
Related Reads You Might Also Love:
🥥 Wholesome Vegan Desserts You’ll Love – From fudgy brownies to no-bake cheesecakes, this roundup proves plant-based treats can be just as indulgent (and creative) as their dairy counterparts.
🥭 Coconut Milk in Ice Cream – How to Get It Perfectly Creamy – Discover how coconut milk can create an irresistibly smooth, rich, and dairy-free ice cream base — plus tips to avoid icy textures.
🍦 Get the Scoop on Need Ice Cream – The Vegan Ice Cream You Need to Try – Our taste test of this exciting vegan brand proves dairy-free can be dreamy, creamy, and downright delicious.
🌱 Craving Ultra‑Creamy (Vegan) Scoops?
Plant-based ice cream has come a long way — and yours can be creamy too!
💬 What’s your dream dairy‑free flavour combo — classic vanilla bean, chocolate fudge swirl, or something wild like mango‑lime cheesecake?
Tag your creations #FrostedFusions on Instagram or Pinterest to be featured.
The Final Scoop
Making creamy vegan ice cream is as much about creativity as it is about technique. Once you’ve mastered the basics, the flavour possibilities are endless — and every batch is a chance to invent a new favourite.
So… what flavour will you create first? 🍦🌱
 We hope that you’ve enjoyed our article — How to Make the Creamiest Vegan Ice Cream (Step-by-Step Guide) — and that it’s inspired you to roll up your sleeves and try making your own plant-based frozen treat. With today’s ingredients and techniques, you might just surprise friends and family with a scoop so creamy they’ll say, “Wait… this is vegan?”
If you have any questions, flavour ideas, or tips of your own, drop us a comment below — we’d love to hear from you and share in your ice cream adventures.
Stay connected for more homemade ice cream inspiration!
Share your vegan ice cream masterpieces with us on social media and join a growing community of frozen dessert enthusiasts. You’ll discover mouthwatering recipes, expert tips, and exclusive updates across all our channels.
📌 Follow us on Pinterest, Instagram, Facebook, and X — simply click any of the social media icons below to join the conversation.
Disclosure: This post contains affiliate links. If you click on these links and make a purchase, we may earn a small commission at no additional cost to you. This helps support our website and allows us to continue creating content. Thank you for your support!










I find this guide incredibly inspiring!
I’ve always been curious about how to achieve a rich, scoopable texture without using dairy, and your tips made it seem very doable. I especially love the idea of blending coconut and oat milk for the perfect base; that’s a genius suggestion! The no-churn method is also a lifesaver for those of us who don’t have an ice cream maker.
I can already imagine trying the vanilla bean recipe and adding my own twist with peanut butter and banana.
Thanks for breaking it down step by step; it really makes vegan ice cream feel approachable and fun to experiment with!
Hi Alyssa,
Nice to see you again, and thank you for another lovely comment.
Glad you appreciated this article and that you liked the tip on blending coconut and oat milk, it really does make such a difference for that creamy, scoopable texture.
And yes, the no-churn method is a total lifesaver for days when we just want ice cream without any extra work.
Your idea of adding peanut butter and banana to the vanilla bean base sounds great – I can imagine that it’ll taste wonderful. I love hearing how readers like you put your own spin on the recipes; it’s part of the fun of homemade ice cream.
Can’t wait to hear how your vegan creations turn out — do share if you try it!
Thanks again for dropping by.
All the best
Cherie
Wow, this recipe makes vegan ice cream feel totally doable! I really appreciate how you broke everything down step by step because sometimes recipes skip details, but yours feels so approachable and foolproof. The mix of churn and no-churn options is a great touch, especially for people who don’t have an ice cream maker at home. I also love the creative flavor ideas you included—things like mango ripple and affogato-style are so unique compared to the usual vanilla or chocolate. Have you noticed a difference in creaminess when using arrowroot vs. xanthan gum as a stabilizer? And out of all the flavors you’ve tested, which one has been your personal favorite to enjoy at home?
Hi Leahrae,
Thank you for your comment — it’s always fantastic to hear that the step-by-step approach makes vegan ice cream feel approachable and fun!
I totally agree, having both churn and no-churn options opens the door for everyone to enjoy homemade ice cream, no ice cream maker required.
As for your question about stabilisers: I’ve found that arrowroot tends to give a slightly silkier, more delicate creaminess, while xanthan gum adds a bit more body and holds up better if you’re adding chunky mix-ins or ripples.
Both work beautifully, but I usually choose based on the texture I’m aiming for and what flavours I’m working with.
And my personal favourite? Oh, that’s tough… but I’d probably say the affogato-style — there’s something irresistible about that espresso-coconut combination. It feels indulgent, but still light and refreshing.
I’d love to hear which flavour you end up trying first — experimenting is half the fun!
Thanks again for sharing your thoughts,
Wishing you all the best
Cherie