Learn all about these must-have hacks to elevate your homemade ice cream game. From creamy textures to unique flavours. Learn the secrets to perfecting your ice cream at home!
We all love ice cream, the world over and there’s something truly special about making your own ice cream at home. Not only can you tailor the flavours to your exact liking, but you also get to enjoy the satisfaction of creating a delicious treat from scratch.
However, getting it right can sometimes be tricky. Fear not! In this article, we’ll provide Homemade Ice Cream Hacks You Need To Know – essential tips, tricks, and hacks to help you achieve the creamiest, most delicious homemade ice cream.
Get ready to elevate your ice cream game and impress your friends and family with your newfound skills!
Scoops and Snags: Common Ice Cream Mishaps
Below, we’ve listed the top ten most common problems that people encounter when making homemade ice cream and we’ll provide some useful hacks to get around these:
- Ice Crystal Formation: Instead of a smooth, creamy texture, the ice cream ends up with icy crystals.
- Overly Hard Ice Cream: The ice cream becomes rock-hard after freezing, making it difficult to scoop.
- Soft or Runny Ice Cream: The ice cream doesn’t freeze properly and remains too soft or runny.
- Curdled Custard Base: The custard base curdles or separates while cooking, resulting in a lumpy texture.
- Weak or Bland Flavour: The ice cream lacks strong flavour or the added ingredients don’t come through well.
- Freezer Burn: The ice cream develops freezer burn, affecting the taste and texture negatively.
- Uneven Mix-Ins: The added mix-ins (like chocolate chips, nuts, or fruit) are not evenly distributed throughout the ice cream.
- Too Sweet or Not Sweet Enough: The sweetness level of the ice cream is off, either too sugary or not sweet enough.
- Greasy or Oily Texture: The ice cream has a greasy or oily mouthfeel, often due to an imbalance of fat in the mixture.
- Churning Issues: Problems with the ice cream maker, such as not freezing properly or the mixture not churning to the right consistency.
I’m sure if you’ve tried making your own ice cream, you may have come across a couple of these if not all in one way or another, I know I certainly have, The great news is with a few tweaks and simple measures you can avoid all of the above.
Chill Tips and Sweet Hacks for Perfect Ice Cream
If you yearn for delectable homemade ice cream that’s got that silken texture good enough to rival the upscale parlour varieties, there are a few foundational steps you absolutely mustn’t skip.
Storage Container
Let’s start with your storage container. Using a freezer-safe container might seem obvious, but here’s the important step most miss: if you chill it in the freezer before you pile in your freshly churned ice cream, you’re going to help it freeze quicker and more evenly.
This simple act wards off the formation of those pesky large ice crystals that can make your ice cream grainy.
Pre-chilled Ingredients
The next hack is for those all-important ingredients like cream and milk; cooling them in the refrigerator before they meet the churner is crucial. You see, a colder starting point not only speeds up the freezing process but also helps in achieving that dream-worthy creamy texture that we all crave.
This isn’t just about chilling, it’s also about nailing the science of crystallisation to your advantage.
The Double-Boiler
The next tip we’d like to share is for those who swear by the custard-based style of homemade ice cream. There’s the double-boiler method. You might be wondering, ‘What’s the big deal about it about a double-boiler?’ Well, by using this gentle heating approach, you prevent the eggs in your custard from meeting an untimely scramble while ensuring the mixture reaches a velvety smooth consistency.
Heating your mixture with a water bath before churning is like giving your ice cream a first-class ticket to Creaminess Heaven!
Layering Layers
 Now let’s talk about layering. This is a method of adding texture and taste to your ice cream. Rather than just mixing in your favourite chunks of chocolate or swirls of fruit puree, try layering them. Alternate pouring the ice cream mixture with your chosen mix-ins into your chilled container. This way, you’re greeted with more goodness in every spoonful, and we can guarantee your taste buds will thank you for the even distribution of flavour.
Digging into a scoop of homemade ice cream to discover a burst of fresh fruit is one of life’s simple pleasures. Imagine puree of ripe strawberries or the zing of mango added to your base mixture. You not only infuse your treat with natural sweetness but also add a pop of colour that screams ‘Made with fresh ingredients!’ A creamy, smooth texture paired with the real taste of fruit – it doesn’t get better than that, right?
Next up, we’re going to share some genius moves to make sure your homemade ice cream stays deliciously smooth without any disruptive ice crystals intruding on the party.
Perfect Scooping Technique:
A very simple hack is to warm your ice cream scoop in hot water before scooping. This helps the scoop glide through the ice cream more easily, making it easier to serve.
A warm scoop melts the ice cream slightly, allowing for smoother and more uniform scoops.
Mastering the Quenelle Technique:
Have you ever watched a TV cooking program and seen the chefs seamlessly in one smooth movement create a quenelle or Rocher of ice cream, so perfectly and smoothly? Want to learn how to do this too? To create elegant quenelles (oval-shaped scoops), use two spoons or a single large spoon. Dip the spoon in warm water, then scoop the ice cream and shape it between the two spoons, or roll it against the side of the container.
This technique creates a professional and visually appealing presentation, perfect for impressing guests.
Quick Freeze Method:
If you’re in a hurry, spread the ice cream mixture thinly on a baking sheet and freeze it for faster solidification before transferring it to a container. The thin layer freezes more quickly, speeding up the overall process.
Adding Air for Lightness:
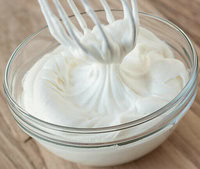 Whip your cream until soft peaks form before folding it into the ice cream mixture. This incorporates air and results in a lighter, fluffier texture. Air adds volume and a lighter mouthfeel, similar to commercial ice cream.
Infusing Flavours:
Steep ingredients like vanilla beans, mint leaves, or coffee grounds in your milk or cream before mixing to infuse your ice cream with subtle, complex flavours. Infusing flavours directly into the base creates a more intense and nuanced taste.
Roasting your Ingredients:
Roasting fruits (or other ingredients) before adding them to your ice cream base can significantly enhance their flavour and texture.
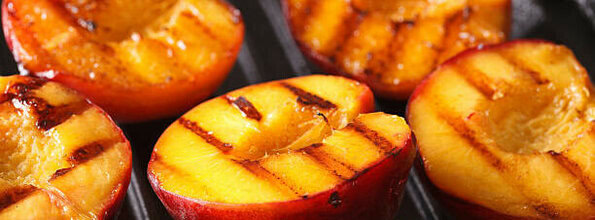
Why It Works:
- Concentrates Flavours: Roasting intensifies the natural sweetness and flavour of fruits by caramelising their sugars. This results in a richer, more robust taste compared to using raw fruits.
- Reduces Water Content: Raw fruits often have a high water content, which can lead to ice crystal formation and a less creamy texture in your ice cream. Roasting helps reduce the water content, leading to a smoother, creamier ice cream.
- Adds Complexity: The process of roasting adds depth and complexity to the flavour profile of your ice cream. You get those lovely caramelised notes that can’t be achieved with raw ingredients.
- Enhances Aroma: Roasting releases aromatic compounds, enhancing the overall sensory experience of your ice cream. The delicious aroma of roasted fruits can make your homemade ice cream even more enticing.
- Improves Texture: Roasting softens the fruits, making them easier to blend into the ice cream base and ensuring an even distribution of fruit chunks without large icy pieces.
Avoid Over-Churning:
A common mistake that people can make is over-churning their ice cream. Pay close attention to the churning process and stop as soon as the ice cream reaches a soft-serve consistency. Over-churning can lead to a dense, buttery texture. Proper churning ensures the ice cream is light and smooth.
Salt to Control Melting:
Adding a pinch of salt to the mixture can help control melting and enhance flavours. Salt lowers the freezing point, helping the ice cream stay creamy. Salt balances sweetness and improves texture by affecting how the ice cream freezes.
Incorporate Gelatin for Stability:
Dissolve a small amount of gelatin in warm water and mix it into your base. This helps prevent ice crystals and improves the texture. Gelatin acts as a stabilizer, creating a smoother and more consistent texture.
Use Egg Yolks for Richness:
Adding extra egg yolks to your custard base increases richness and creaminess. Be sure to cook them gently to avoid curdling (back up to the double-boiler method). Egg yolks add fat and emulsifiers, improving texture and flavour.
Proper Storage:
After churning, place a piece of parchment paper directly on the surface of the ice cream before sealing the container. This minimises air exposure and prevents freezer burn. Reducing air contact helps maintain the ice cream’s texture and flavour.
The Art and Science of Smoothness: Say Goodbye to Ice Crystals
Let’s share with you some wizardry that turns the common frustration of ice crystals into a distant memory. Ice crystals can be the bane of any ice cream enthusiast’s existence, but there’s a nifty trick that can put an end to that: alcohol!
 Adding a small amount of alcohol, think vodka or rum, can lower your ice cream’s freezing point which discourages those pesky crystals from forming.
This isn’t just about adding a kick of flavour – it’s a scientific approach to delivering velvety texture. Since alcohol freezes at a much lower temperature than water, it remains slushy within your ice cream mixture, thereby preventing the formation of large, crunch-inducing ice crystals.
For more detailed information on the science of blending alcohol with Ice cream, check out our article – The Art and Science of Blending Alcohol with Ice Cream – Frosted Fusions.
Essential Kit and Creamy Tricks for Churning Success
So you’ve prepped your ingredients, chilled your storage containers and you’re ready to churn. But wait, it’s not just about throwing everything in and hoping for the best. A few key practices can make all the difference between good and extremely good homemade ice cream.
First off, make sure your ice cream maker bowl is as cold as it can be. Freeze it overnight, at the very least. This isn’t just a whim; it’s a must for achieving the perfect texture. A fully frozen bowl ensures that the freezing process begins swiftly when you start churning, resulting in a smoother ice cream with less risk of ice crystal formation.
One of my favourite tricks is adding condensed milk to the base. This isn’t just about indulgence; it serves a practical purpose too. Condensed milk brings a rich texture and added sweetness, which means you can sometimes skip the extra sugar. Plus, it’s a handy shortcut to creaminess – no custard-making required.
And for those who are keen on maintaining that creamy dreaminess, consider using a stabiliser. I’m referring to things like cornstarch or guar gum. These aren’t just fancy-named ingredients, they’re your allies in the fight against melting, particularly if you’re venturing into recipes with high water content from fruits or other add-ins.
Fine-Tuning Flavours: Sweeten the Deal with Healthy Variants
In this section, we’ll guide you through the world of sweet alternatives. Sure, sugar and spice and all things nice, but there are so many other options that can add depth, character, and even a touch of health to your homemade concoction.
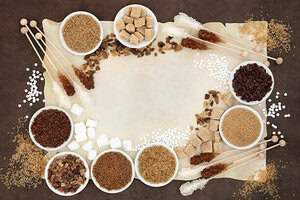 Stepping away from traditional sugar doesn’t mean sacrificing the sweetness we all love in our frozen treats. By choosing options like honey, maple syrup, or agave nectar, you’re not just sweetening your dessert; you’re enhancing the flavour palette.
These natural sweeteners offer distinct tastes that can complement your ice cream in ways that refined sugar can’t match. Whether it’s the rich, aromatic profile of honey or the subtle, caramel-like notes of maple syrup, each brings something special to the table. Don’t worry too much about exact measurements at first – taste as you go and trust your palate.
And it’s not only about taste. These alternative sweeteners can offer a more nuanced sweetness and, in some cases, additional health benefits compared to white sugar – think antioxidants in honey or the lower glycemic index of agave nectar.
For more detailed information about using alternative sweeteners in your homemade ice cream, check out our article – Balancing Flavour and Health: Natural Sweeteners and Homemade Ice Cream – Frosted Fusions
The beauty of homemade ice cream is not only in its creamy texture but also in its endless possibilities for customisation. Choosing something that resonates with you, both in taste and health considerations, is key to your ice cream adventures.
There’s a lot of opportunity in these natural sweeteners to make your homemade ice cream stand out. In the end, it’s these little touches that can elevate simple homemade ice cream into a personal masterpiece.
We hope that you have enjoyed our article – Homemade Ice Cream Hacks You Need To Know – and have found lots of value in the many hacks we have shared. If you have any questions, please do drop us a comment below and we’ll be happy to get back to you. We would love to hear your ice cream hacks too, so please do share away.
Stay connected for more homemade ice cream inspiration! Join us for mouthwatering recipes, expert tips, and exclusive updates. Follow us on Pinterest, Instagram, Facebook, and X by clicking on any of the social media icons below.












Who doesn’t enjoy a good ice cream. The hacks that you have shared in this post are great to know to avoid some common ice cream making errors. I love the different varieties of frozen desserts, from ice cream to gelato to custards and beyond.
Your website is very well constructed, great navigation and, and is especially inviting to the palate. Best of luck to you.
Hi Walter,
Thanks for your comment and for taking the time to share your thoughts and yes indeed, who doesn’t like ice cream?
Glad you appreciated the article and the hints and tips we’ve shared to help our readers make their own delicious homemade ice cream. There are many more articles like this one that offer even more ideas and hints. If you haven’t had a chance do check them out.
Thanks once again for your comment.
All the best
Cherie :o)