
Struggling with icy homemade ice cream? Learn why it happens and discover natural fixes for smooth, creamy texture — no fancy stabilisers required.
Ever excitedly churned a batch of homemade ice cream only to find it turns into a frosty, rock-solid block the next day? You’re not alone!
Icy texture is one of the most common frustrations for home ice cream makers — but the good news? It’s totally fixable.
In this guide, we’ll explain what causes that crunchy texture, how to rescue icy batches, and — most importantly — how to stop it happening again. No stabilisers, no additives, just simple, clever techniques for a smoother, creamier scoop every time.
✅ In This Article, You’ll Find:
- Why does homemade ice cream turn icy
- The science behind ice crystal formation
- How to fix an already icy batch
- Simple ways to prevent it next time
- A creamy, ice-free vanilla base recipe
- Troubleshooting tips for soft, scoopable texture
🍦 Why Homemade Ice Cream Turns Icy
Homemade ice cream doesn’t contain the stabilisers, emulsifiers, or industrial freezing methods that commercial brands use. Instead, it relies entirely on how well air, fat, sugar, and water are balanced.
When that balance is off — too much water, not enough fat or sugar, or insufficient churning — the water molecules freeze into large crystals. And those crystals? That’s your crunch.
 The Main Culprits:
- Too much water content: From juicy fruits or milk-heavy bases.
- Low sugar or fat: These help lower the freezing point.
- Slow freezing: The longer it takes to freeze, the bigger the crystals.
- Improper storage: Air exposure and fluctuating freezer temps worsen the texture.
💡 Did You Know?
Every time you open your freezer, the temperature rises slightly — encouraging ice crystals to reform. Keep ice cream towards the back of your freezer, not near the door!

🔬 The Science Behind Smoothness
Smooth ice cream happens when ice crystals stay tiny. That’s why custard-based recipes (with eggs) or commercial emulsifiers work so well — they control water and fat bonding.
But you don’t need those. Natural alternatives like honey, maple syrup, or ripe fruit purée act as humectants, holding onto moisture and reducing iciness. A good blend of sugar, fat, and agitation (churning) keeps everything silky.
Think of it like making snow — if it freezes slowly, you get chunky slush. Freeze it quickly, and you get fine powder. Same concept, tastier result! ❄️
How to Fix Icy Homemade Ice Cream (Quick Rescue Method)
All is not lost if your ice cream has already gone icy! You can revive it with this simple technique:

- Scoop it into a blender or food processor.
- Add a splash of milk, cream, or coconut milk (about 2 tbsp per 500 ml of ice cream).
- Add a touch of sweetness — honey or maple syrup helps improve texture.
- Blend until smooth again.
- Refreeze for 1–2 hours — covered with parchment or cling film to block air exposure.
💡 Pro Tip: This method also refreshes texture in older batches that have been stored too long.

Step-by-Step Guide to Prevent Icy Ice Cream
Here’s your freezer-friendly checklist for smoother results:
- Chill your base completely before churning (at least 2–4 hours).
- Use full-fat ingredients — fat insulates ice crystals.
- Add sugar or syrup — it keeps the mix creamy.
- Limit watery fruits or strain their juice before blending.
- Don’t overchurn. Once it thickens, stop. Overchurning breaks the emulsion.
- Cover tightly before freezing — air is the enemy of texture.
Follow these steps, and you’ll already be halfway to silky perfection — now let’s put the theory into practice with a creamy vanilla base that freezes beautifully every time.
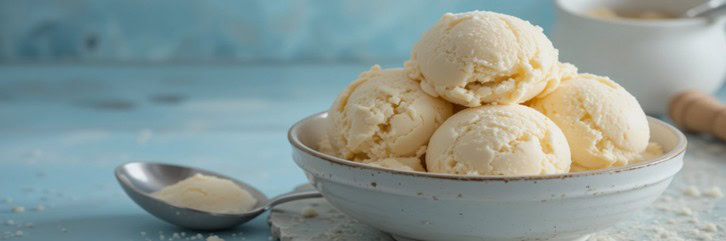
Creamy Vanilla Base Recipe (No Icy Texture!)
Here’s a reliable, creamy base that stays smooth and scoopable — naturally.
(Prep Time: 10 mins | Chill Time: 2 hrs | Freeze Time: 3 hrs | Serves: 4)
 Ingredients:
- 300 ml double cream
- 200 ml whole milk
- 75 g sugar or 2 tbsp honey
- 1 tsp vanilla extract
- Pinch of salt
Method:
- Heat the milk, cream, and sugar gently until dissolved (don’t boil).
- Stir in vanilla and salt.
- Chill completely, then churn until thick and creamy.
- Transfer to a freezer-safe container and cover with parchment before sealing.
- Freeze for 3 hours — soften for 10 minutes before serving.
Nutrition (per serving):
- Calories: ~210 kcal | Fat: 14 g | Sugar: 18 g | Protein: 3 g
🧁 Troubleshooting Quick Table
| Problem | Likely Cause | Simple Fix |
|---|---|---|
| Ice crystals forming | Too much water | Use creamier base or reduce fruit juice |
| Icy after storage | Air exposure | Press cling film directly on surface |
| Too firm to scoop | Not enough sugar or fat | Add syrup or honey to soften |
| Melts too fast | Too much sugar or alcohol | Reduce sweeteners slightly |
❓ Frequently Asked Questions
Why does my ice cream get icy even after using cream and sugar?
Even with the right ingredients, slow freezing or air exposure can cause ice crystals to reform. Make sure your base is fully chilled before churning, and cover your ice cream tightly during storage.
Can I fix icy ice cream without re-churning it?
Yes! Blend the icy ice cream with a small splash of cream or coconut milk, then refreeze it for 1–2 hours. It’ll regain a smoother, creamier consistency without needing to start over.
What’s the best way to store homemade ice cream?
Use an airtight container and press a layer of cling film or parchment directly on the surface to block air contact. Store it at the back of your freezer to maintain a consistent temperature.
Does using an ice cream machine prevent iciness?
It helps, but it’s not foolproof. The machine simply aerates and chills your base faster. The real secret lies in the recipe balance — enough fat, sugar, and pre-chilling to prevent large ice crystals forming.
What natural ingredients help keep ice cream soft?
Honey, maple syrup, and ripe fruit purées act as natural humectants, locking in moisture and keeping the texture soft. A spoonful of nut butter or coconut cream also helps maintain that creamy scoop.

🔗 Related Reads You Might Also Like
If texture troubles have been your nemesis, these reads will help you perfect every scoop from soft to scoopable:
👉🏽 How to Make Homemade Ice Cream Soft, Fluffy, and Scoopable: Learn how air, sugar, and temperature work together to create that irresistible soft-scoop finish.
👉🏽 How to Thicken Homemade Ice Cream Naturally (Without Eggs or Stabilisers): Discover how to achieve luxurious texture with simple, natural thickeners like banana and coconut cream.
👉🏽 Why Your Ice Cream Isn’t Freezing (and How to Fix It): Understand what’s happening beneath the lid — and how to get your churns right every time.
💬 What’s Your Trick for Smooth Ice Cream?
Have you ever rescued an icy batch or found a clever way to keep your ice cream perfectly scoopable? We’d love to hear your tip or “aha” moment — your idea might just inspire our next article!
Share your scoop in the comments below 🍨
The Final Scoop
You don’t need fancy stabilisers to stop homemade ice cream turning icy — just the right balance of natural ingredients and a few freezing tricks.
By controlling water, fat, and air, you’ll turn every batch into a silky-smooth success — even the rescued ones!
We hope that you’ve enjoyed our article — How to Fix Icy Homemade Ice Cream (And Prevent It Next Time) — and that we’ve inspired you to give these simple techniques a try. With just a few small tweaks, you’ll be scooping smooth, creamy ice cream that’s every bit as indulgent as it should be.
If you have any questions, tips of your own, or favourite homemade ice cream stories, drop us a comment below — we love hearing from fellow ice cream makers and always reply.
Stay connected for more homemade ice cream inspiration! 🍨
Share your creations with us on social media and connect with a community of ice cream enthusiasts just as passionate about flavour and texture as you are.
👉🏽 Join us for mouthwatering recipes, expert tips, and exclusive updates by following Frosted Fusions on Pinterest, Instagram, Facebook, and X — simply click the social icons below.
Disclosure: This post contains affiliate links. If you click on these links and make a purchase, we may earn a small commission at no additional cost to you. This helps support our website and allows us to continue creating content. Thank you for your support!


Hey, Cherie.
This article has really opened my eyes to the science behind ice cream and it is fascinating. I never knew air exposure played such a big role in iciness. Now, I have to be honest here. I have never tried to make icecream before because culturally this, men don’t visit the kitchen, let along cooking or preparing food.
I’m curious though, do these same tips work for dairy-free versions like coconut or almond milk bases? Those always seem to get icy no matter what is done, as I read from other blogs on the same subject. I’m interested to know more, either to learn how to make them myself, or teach others to do so.
As we say back home, “Wisdom is like fire; people take it from others.” I’m taking this one straight to my freezer experiments.
John
Hi John,
Thank you for your thoughtful comment — I appreciate how you bring cultural perspective into the conversation.
Your proverb, “Wisdom is like fire; people take it from others,” fits ice cream perfectly. Every recipe teaches something new, whether you’re the one making it or learning through someone else’s experiment.
To your question about dairy-free bases: yes, the same anti-iciness principles apply, but dairy-free mixes often need a little extra help because they naturally contain less fat and more water than traditional cream.
A few tweaks keep them creamy instead of icy:
Full-fat coconut milk gives the creamiest result — its higher fat content mimics dairy.
Almond, oat, or rice milk are much lower in fat, so you’ll want to add:
a tablespoon of maple syrup or agave (liquid sugars reduce ice crystals),
or a tiny pinch of arrowroot starch or xanthan gum to support texture.
And just like in the article, press baking paper (parchment) directly on the surface before freezing — it prevents air exposure, which is one of the biggest causes of ice crystals.
If you’d like to learn more about dairy-free ice cream making, these articles might be handy:
Step-by-Step Guide to Making Creamy Vegan Ice Cream at HomeBalancing Flavour & Health: Natural Sweeteners and Homemade Ice Cream
And remember John, you don’t need to be “a kitchen person” to enjoy homemade ice cream — most recipes are blend, freeze, and enjoy. Anyone can do that.
Thanks again for joining in — your curiosity always brings great conversation.
All the best,
Cherie